
Short nails can look just as chic as long ones—sometimes even more. When your nail length is natural and practical, the secret is choosing designs that suit a smaller canvas: micro details, clean neutrals, and soft shine that won’t look crowded. These short nail ideas are simple enough for at-home polish, yet polished enough for everyday life—typing, cooking, errands, and everything in between.
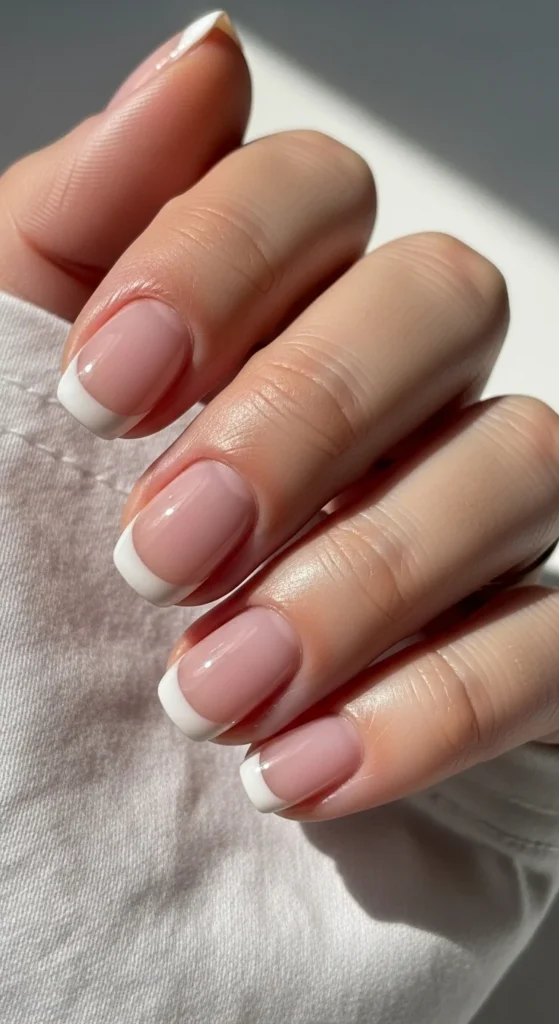
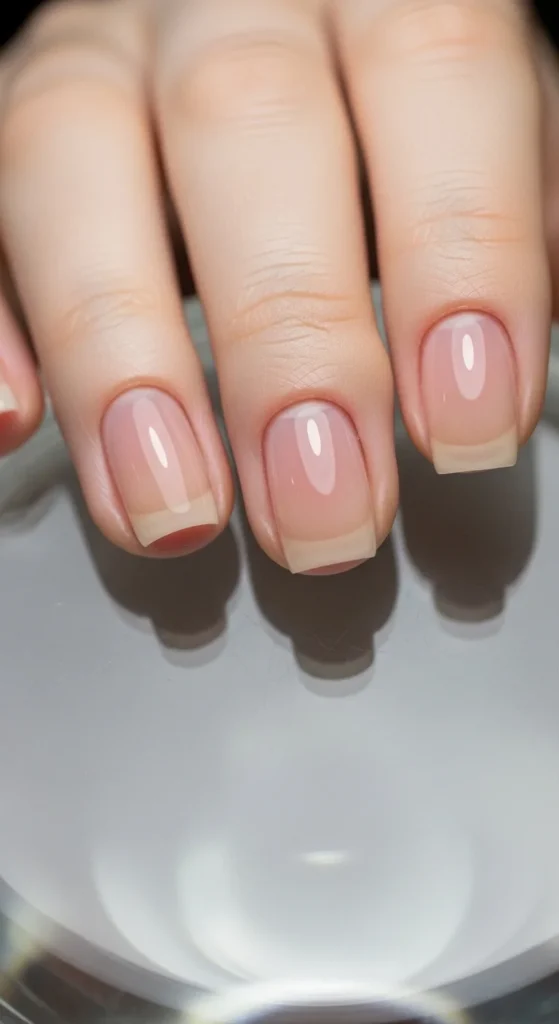
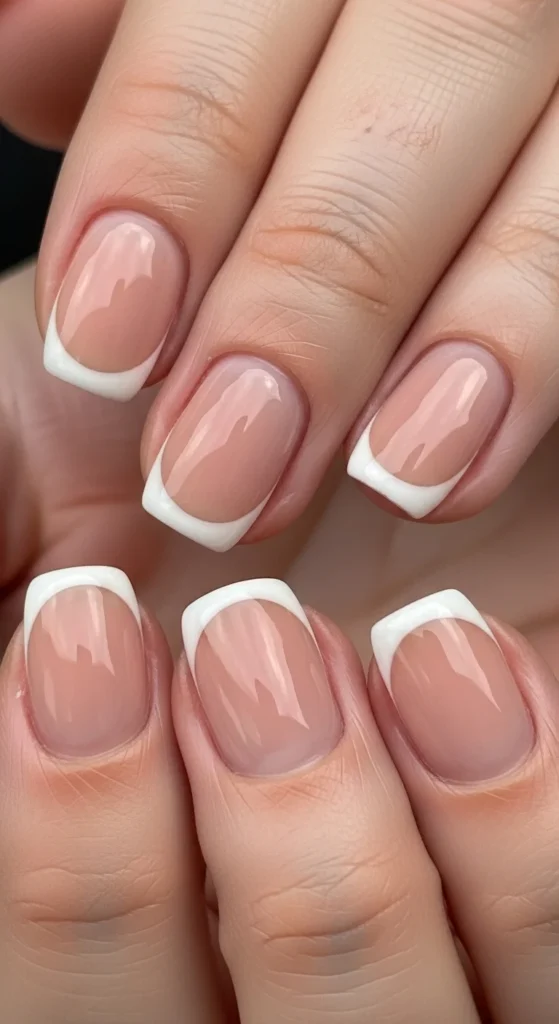
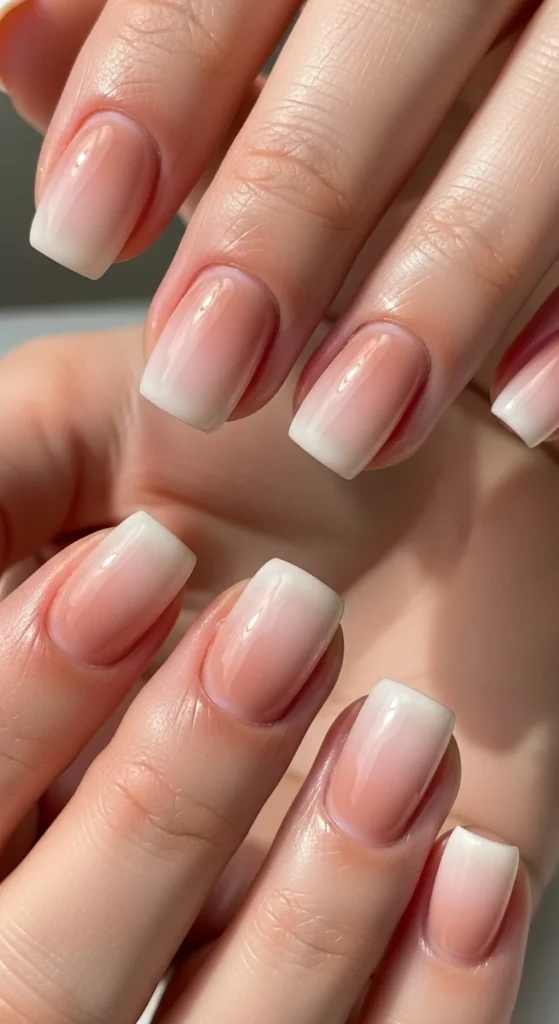
1. Micro French Tips (Ultra-Thin White)
Micro French tips keep the classic idea but fit short nails better. The line should be hair-thin, not bold. Start with a sheer nude or milky base. Let it dry fully. Then use a thin brush, toothpick, or even a bobby pin to trace a tiny white edge right at the tip.
If your line looks uneven, don’t panic—micro lines hide small slips. For an easy DIY method, paint a thin white stripe on a flat surface (like a plastic lid) and lightly press the nail edge into it. Finish with a glossy top coat to smooth texture and add shine.
Budget-friendly tip: choose a sheer base that’s forgiving. Even a low-cost sheer pink can look salon-like if the cuticle area is clean. Keep nails short and softly rounded to make the micro tip look neat and intentional.
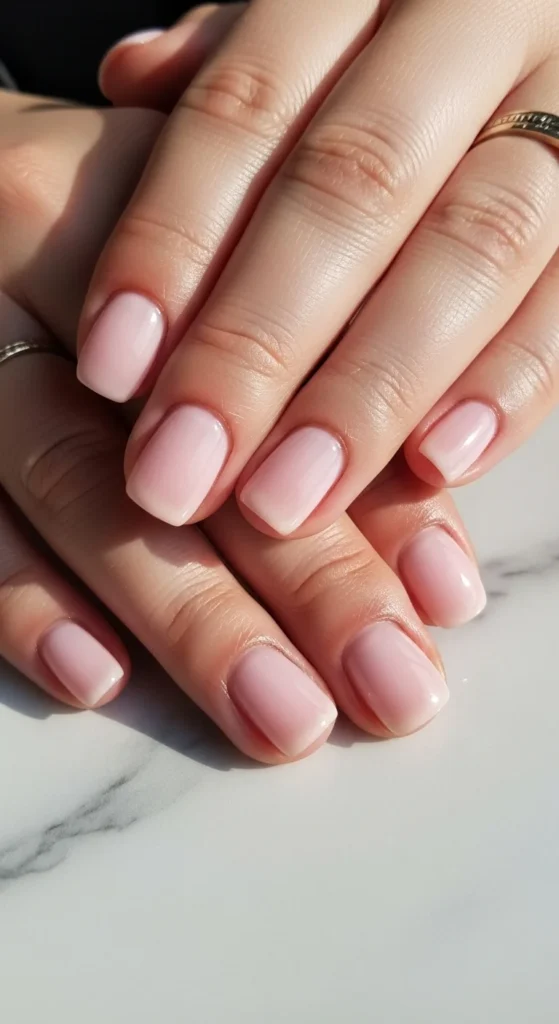
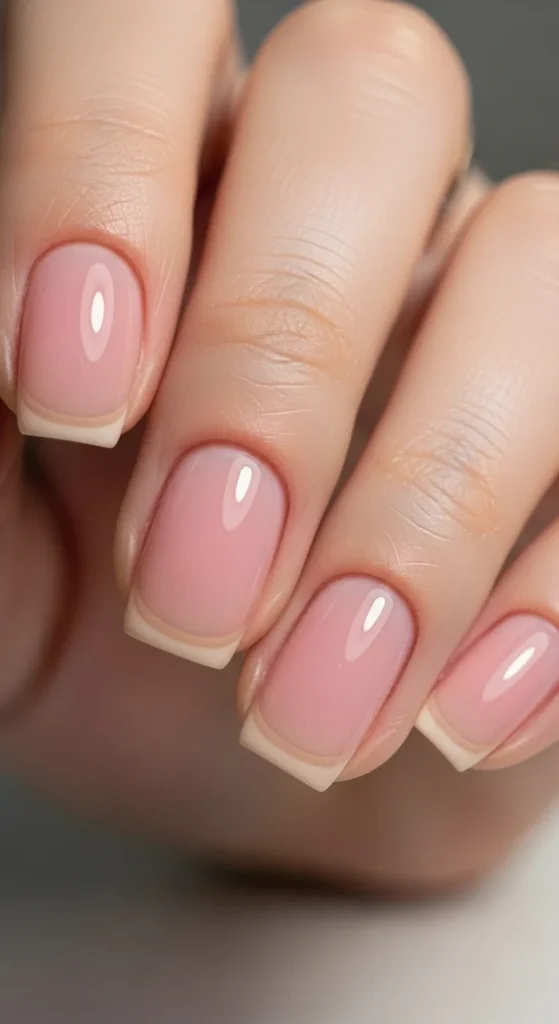
2. Milky “Soap” Sheer Nails
This is the go-to short nail look for an effortless, healthy finish. A milky sheer polish softens the nail bed and hides minor unevenness while still looking natural. It also grows out quietly, which makes it practical.
Apply one thin coat first. Add a second coat only if you want slightly more coverage. Thin layers matter because they dry faster and look smoother. Finish with a glossy top coat for that clean, glassy shine.
DIY tip: file nails into a short oval or round shape. That shape works best with sheers and makes hands look tidy. Add cuticle oil after the manicure for a hydrated look that photographs beautifully.
Budget-friendly tip: drugstore sheer pinks and milky nudes work perfectly. The effect comes from thin coats + glossy top coat, not an expensive bottle.
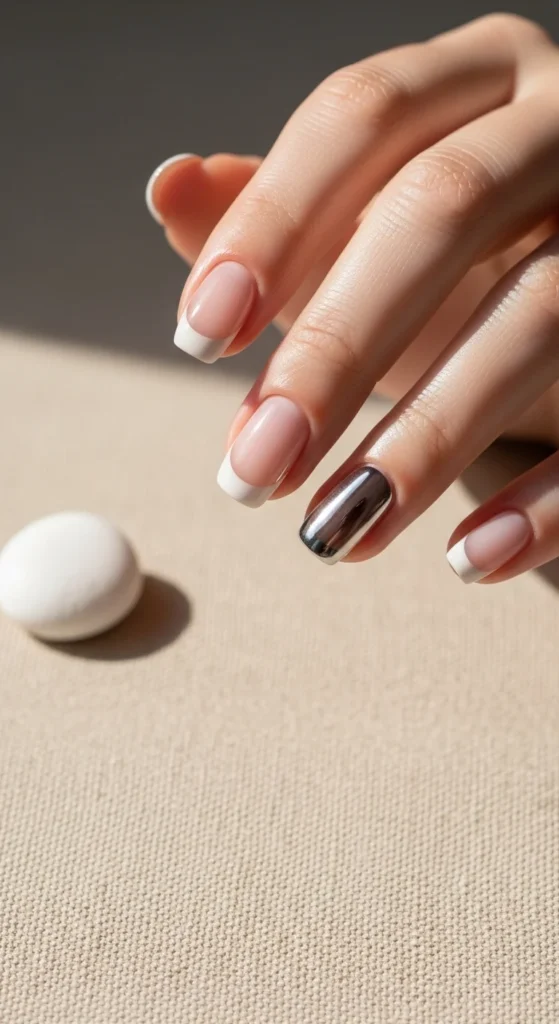
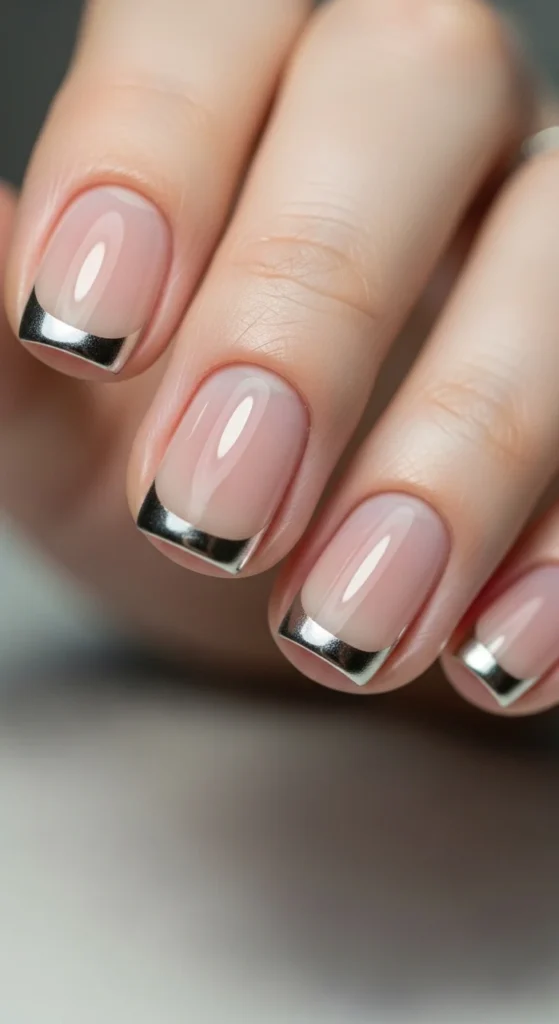
3. Chrome Edge Liner (Subtle Silver Rim)
Chrome doesn’t have to be bold. On short nails, a tiny chrome outline at the tip looks clean and modern. Start with a sheer nude base. Once dry, apply a thin silver line along the free edge using a striping brush or metallic nail art pen.
Keep the line very narrow so it doesn’t overwhelm the nail. Seal with a top coat to stop the metallic detail from wearing off. If you own chrome powder, you can lightly tap it only on the very tip and buff gently, then seal.
DIY tip: do this as an accent on two nails per hand if you want it even simpler. Short nails look best when there’s breathing room.
Budget-friendly tip: metallic pens are inexpensive and easier than brushes. Pair with a sheer base to keep the look calm and wearable.
4. Single Dot Cuticle Accent
This design is perfect for short nails because it adds detail without clutter. Paint nails in a nude, taupe, or milky base. When dry, place one tiny dot near the cuticle using a bobby pin or dotting tool.
Keep dots small. Wipe most polish off the tool before dotting. You can use black for contrast or metallic gold for a softer look. Finish with top coat to lock it in.
DIY tip: if you struggle with placement, do the dot only on the ring finger. One accent nail still looks intentional.
Budget-friendly tip: you don’t need special tools. A bobby pin tip makes clean dots. Short nails also chip less with simple designs like this, which makes it practical for daily life.
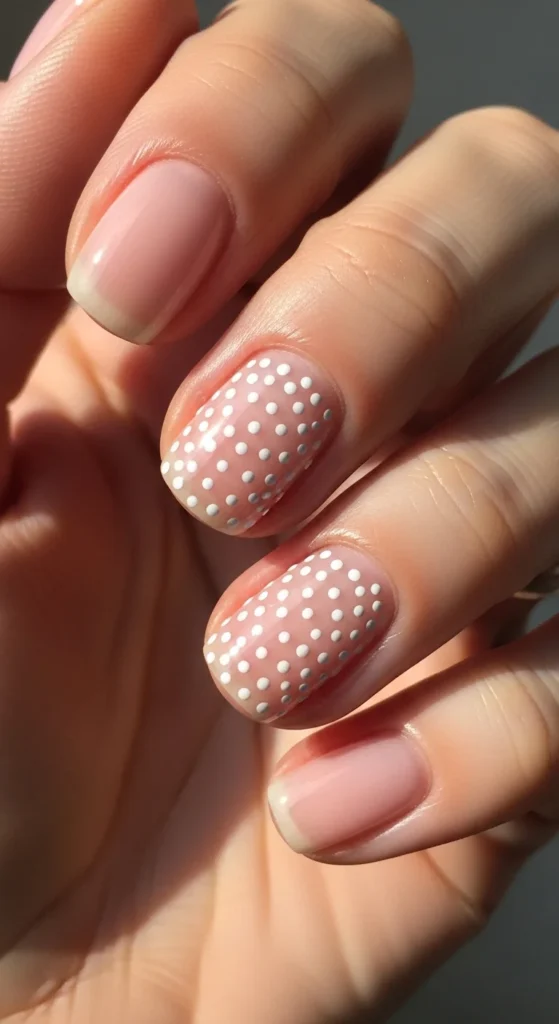
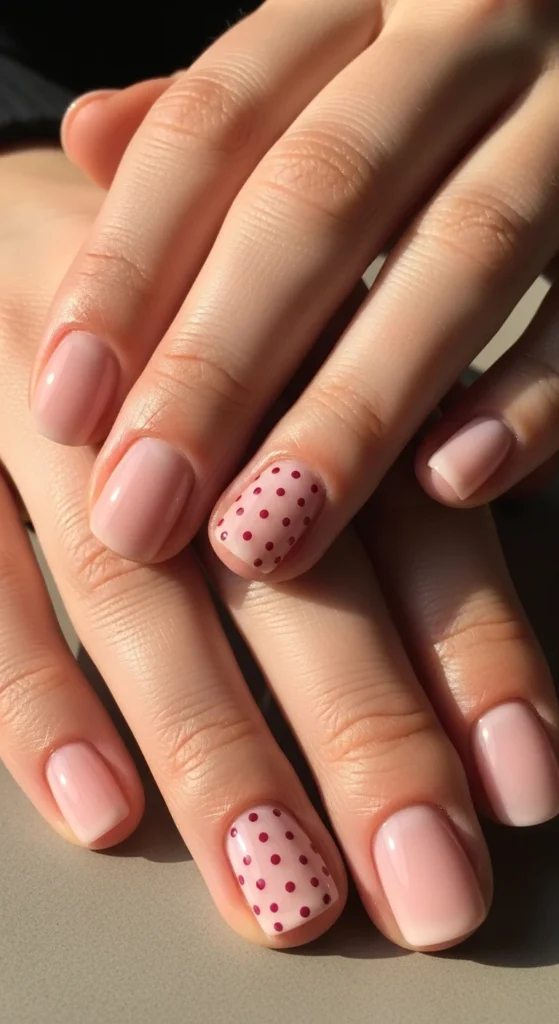
5. Micro Polka Dots (Short-Canvas Friendly)
Micro dots look playful, but on short nails they can still feel neat if you keep them tiny and spaced out. Start with a sheer pink or nude base. Add two or three micro dots per nail, or keep dots only on accent nails.
Use a bobby pin for tiny dots. If the dots get too large, the design can feel crowded on short nails. A glossy top coat helps the dots look smooth and less raised.
DIY tip: use two dot sizes—one tiny and one slightly larger—to make it look planned without being complex.
Budget-friendly tip: choose neutral bases like taupe or milky pink. They hide small chips and make the dots look crisp. This is a great option when you want “cute short nails” but still want them to look tidy.
6. Negative Space Triangle Near the Cuticle
Negative space works beautifully on short nails because the natural nail becomes part of the design. Paint a sheer nude base. Use small tape pieces to block off a tiny triangle near the cuticle, then paint around it with a neutral shade like beige or taupe.
Peel tape while polish is slightly wet for clean edges. Seal with top coat.
DIY tip: keep the triangle small and centered. Big shapes can look heavy on short nails. This style also grows out nicely because the cuticle area stays mostly clear.
Budget-friendly tip: washi tape works well. You can also use a small angled brush dipped in remover to sharpen edges if needed. Short nails look extra neat with this design when your cuticles are clean and moisturized.
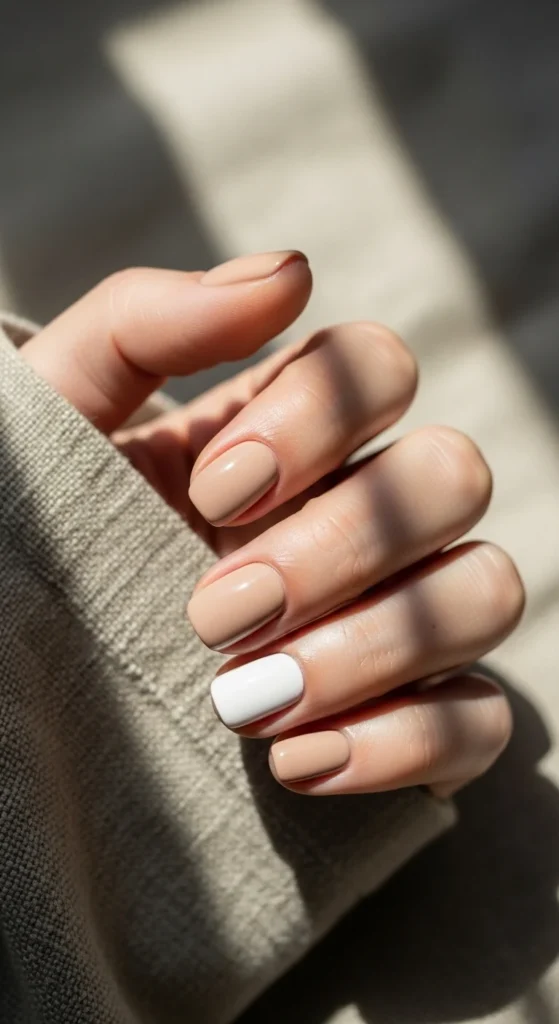
7. Clean Neutral Solids With One Accent Nail
Short nails look sharp in a single neutral shade. Try beige, taupe, or soft pink. Then paint one nail (like the ring finger) in a lighter shade such as soft white or milky nude.
This keeps things interesting without turning into heavy nail art. Two coats of color plus top coat is enough.
DIY tip: if your polish streaks, apply thinner coats and allow drying time between them. A ridge-filling base coat can help smooth the nail surface.
Budget-friendly tip: neutrals are forgiving. Minor chips are less obvious than with dark colors. If you want extra detail, add a tiny dot near the cuticle on the accent nail only.
8. Pastel Block Color (Baby Blue or Soft Lilac)
A simple pastel solid looks adorable on short nails because it feels clean and graphic. Pick one pastel shade—baby blue, lilac, or soft peach. Apply two thin coats. Finish with top coat.
DIY tip: pastel polish can streak. Use a white or milky base coat underneath to help the pastel look even with fewer coats. Keep nails short and shaped to match (round or short oval).
Budget-friendly tip: if you only have a bold pastel, soften it by mixing a tiny drop with clear polish on a palette (like a plastic lid). That creates a lighter, short-friendly shade.
This is an easy option when you want color but still want a practical manicure that works for everyday wear.

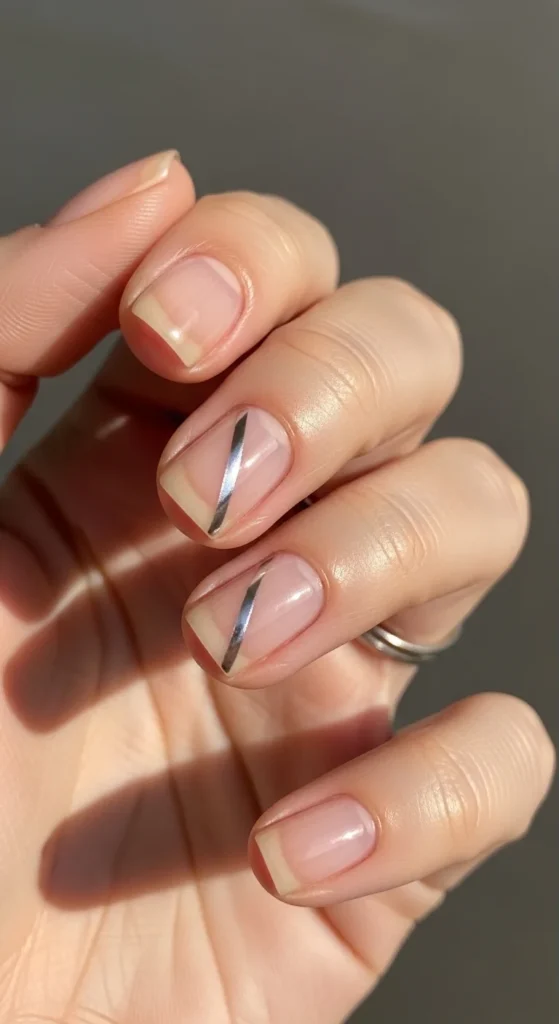
9. One Diagonal Line (Minimal Stripe)
A single diagonal stripe looks modern and fits short nails well. Paint a nude base first. Add a thin stripe across one or two nails using metallic polish and a thin brush, or use striping tape.
Keep the stripe slim. One line is enough. Finish with top coat to smooth everything.
DIY tip: if you don’t have a thin brush, use a toothpick dipped lightly in polish and drag it gently. If the line wobbles a bit, it still looks intentional because it’s abstract.
Budget-friendly tip: nail art tape is inexpensive, but you can also cut a thin strip of regular tape. Press it down firmly to avoid bleed. Short nails look extra crisp with this design because the detail is simple and clean.
10. Jelly Nude Overlay (Glossy, See-Through)
Jelly nails look great on short lengths because they keep the nail light and shiny. Use a translucent nude or pink jelly polish. One coat gives that glassy tint. Two coats adds a bit more color, but keep it see-through.
DIY tip: jelly polish looks best on smooth nails. Use a base coat to reduce bumps. Finish with a glossy top coat for extra shine.
Budget-friendly tip: many sheer “lip gloss” style polishes mimic the jelly effect. The key is not over-layering. Short nails look neat and modern when the nail line still shows slightly.
This style is ideal when you want a low-maintenance manicure that grows out quietly and still looks polished through daily wear.
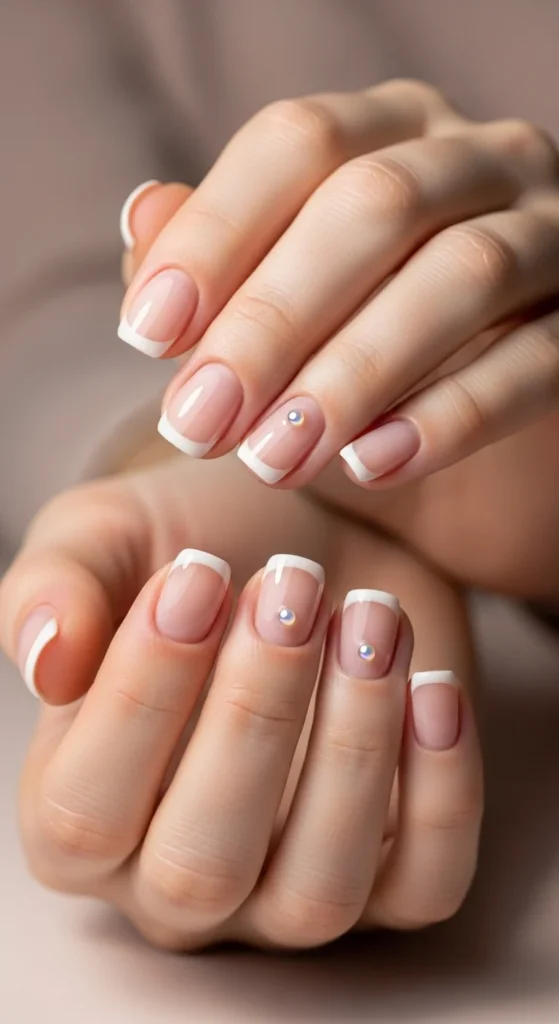
11. Micro French With Tiny Pearl Detail
This design keeps short nails classy while adding a small accent. Start with a micro French tip (white or soft beige). On one nail, place a tiny pearl where the tip begins, or near the cuticle for balance.
Use nail glue or thick clear top coat to hold the pearl. Seal carefully around it without flooding it.
DIY tip: choose the smallest pearl possible. Big pearls look bulky on short nails. If pearls feel tricky, use a small white dot instead.
Budget-friendly tip: craft pearls work well. This is a simple way to make a basic short manicure feel special without needing complex tools.
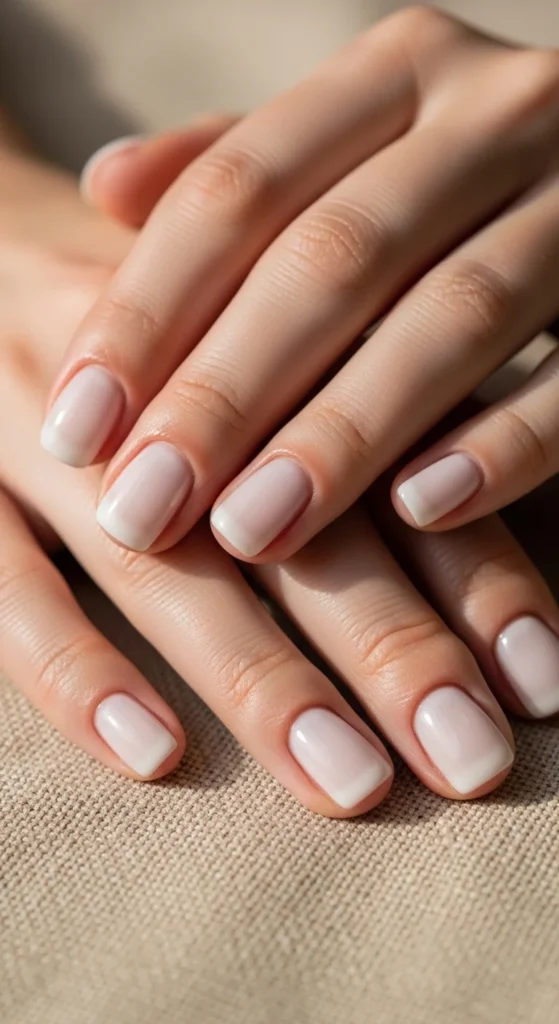
12. Cloudy Soft White Short Nails
Soft white looks clean and modern on short nails. Instead of full opaque white, aim for a slightly sheer, cloudy finish. Apply thin coats to reduce streaks.
DIY tip: if your white polish is too strong, layer it over a milky base. Or mix a tiny amount of clear polish with white on a palette to soften it. Seal with a glossy top coat.
Budget-friendly tip: even an inexpensive white polish can look smooth if you use thin coats and let them dry properly. This style suits everyday outfits and makes short nails look tidy and intentional.
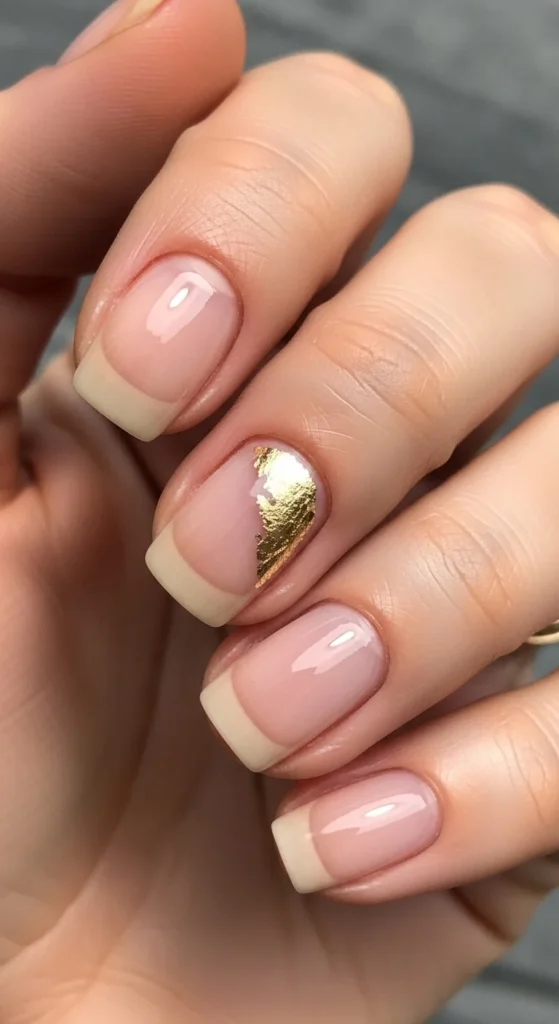
13. Nude Base With One Gold Foil Flake
Gold foil looks fancy, but you only need one tiny piece for a short-nail-friendly look. Paint a nude or milky base. Place one small foil flake on the ring finger or thumb while the polish is slightly tacky. Seal with top coat.
DIY tip: keep foil tiny. One flake per hand is enough. Too much foil can look crowded on short nails.
Budget-friendly tip: if you don’t have foil, use a tiny dab of gold glitter polish applied with a toothpick. You’ll get a similar sparkle with what you already own.
This design is great when you want something special but still practical for daily tasks.
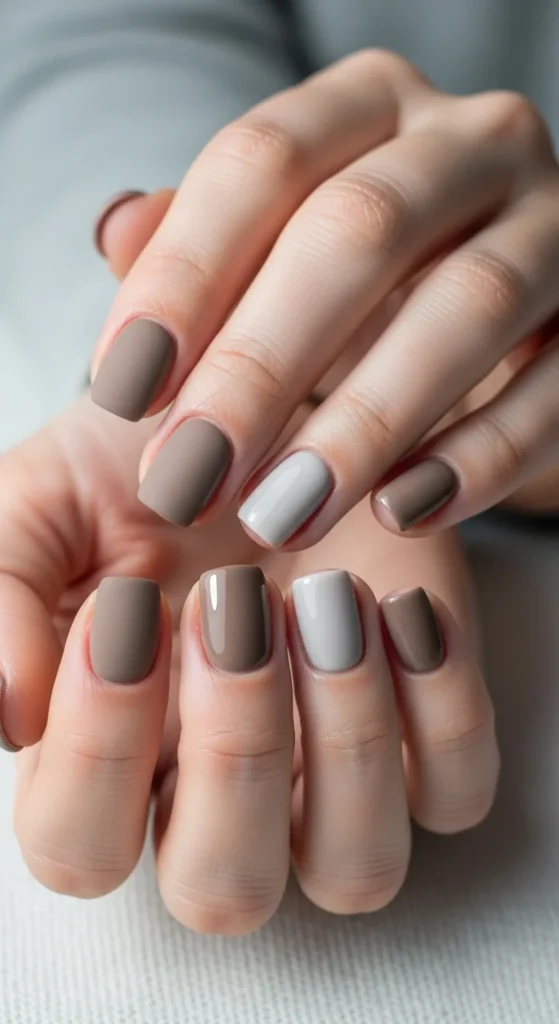
14. Matte Taupe With One Glossy Accent
Mixing finishes is an easy trick for short nails. Paint all nails taupe. Apply matte top coat on most nails. Leave one nail glossy, or add glossy top coat only on the accent nail.
DIY tip: matte top coat can show dryness. Apply hand cream and cuticle oil after the manicure to keep the look clean.
Budget-friendly tip: you don’t need two colors—just one taupe polish and two different top coats. This works well for short nails because the contrast is subtle, not busy.
15. Half-Moon Detail (Tiny Cuticle Curve)
Half-moon designs fit short nails because the detail sits near the cuticle. Start with a nude base. Use a small round sticker (or hole reinforcer sticker cut down) to mask a half-moon near the cuticle. Paint the rest with a soft shade like beige or pale pink. Remove the sticker and seal.
DIY tip: keep the half-moon small. This keeps the nail looking longer and cleaner.
Budget-friendly tip: stickers from stationery sets work fine. This manicure also grows out nicely because the cuticle area stays neat.
16. Outline French Tips (Thin Border Only)
Instead of painting the whole tip, trace a thin border around the edge. Start with a nude base. Use a fine brush to outline the tip in soft beige, white, or taupe.
DIY tip: do this on just two nails if you want it simpler. Outline tips look very modern on short nails and hide small mistakes.
Budget-friendly tip: a nail art pen makes this easy. Seal with top coat so the line stays crisp.
17. Nude With Subtle Shimmer Top Coat
This is one of the easiest short nail designs for everyday wear. Apply a nude base (or even just a clear base). Then add a sheer shimmer top coat that catches light softly.
DIY tip: one layer is enough. Too many coats can look chunky on short nails. Seal with a glossy top coat if the shimmer polish isn’t shiny enough.
Budget-friendly tip: you can use eyeshadow as a soft shimmer by tapping a tiny amount onto a tacky clear layer, then sealing—works best with fine shimmer, not chunky glitter.
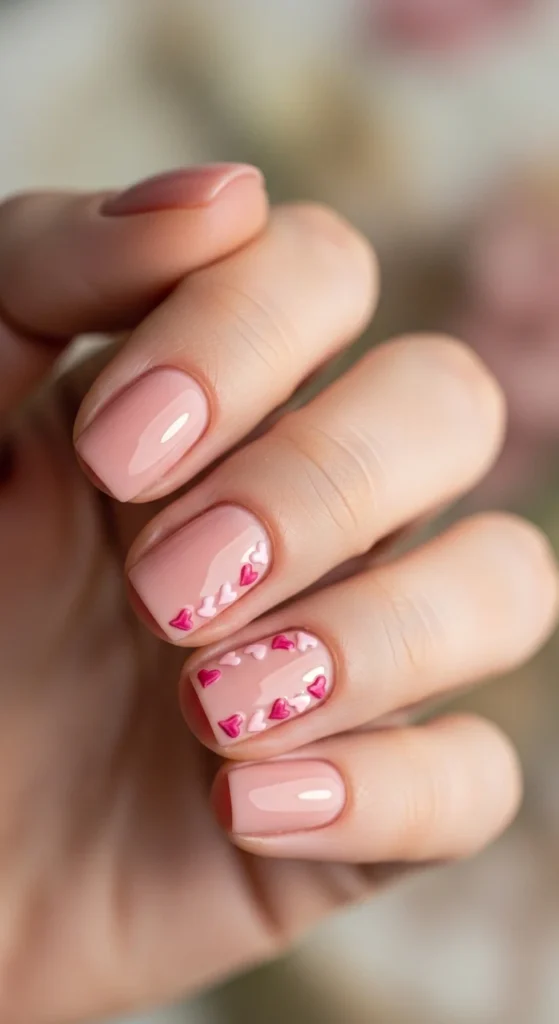
18. Tiny Heart Accent (One Nail Only)
Short nails can still look cute without looking crowded. Paint a nude or milky base. Add one tiny heart on the ring finger using a toothpick. Use white, soft red, or pale pink.
DIY tip: make the heart using two small dots that touch, then drag down gently to form the point. Seal with top coat.
Budget-friendly tip: if freehand hearts are hard, use a dot only and keep it minimal. The small canvas makes micro details look sweet without effort.
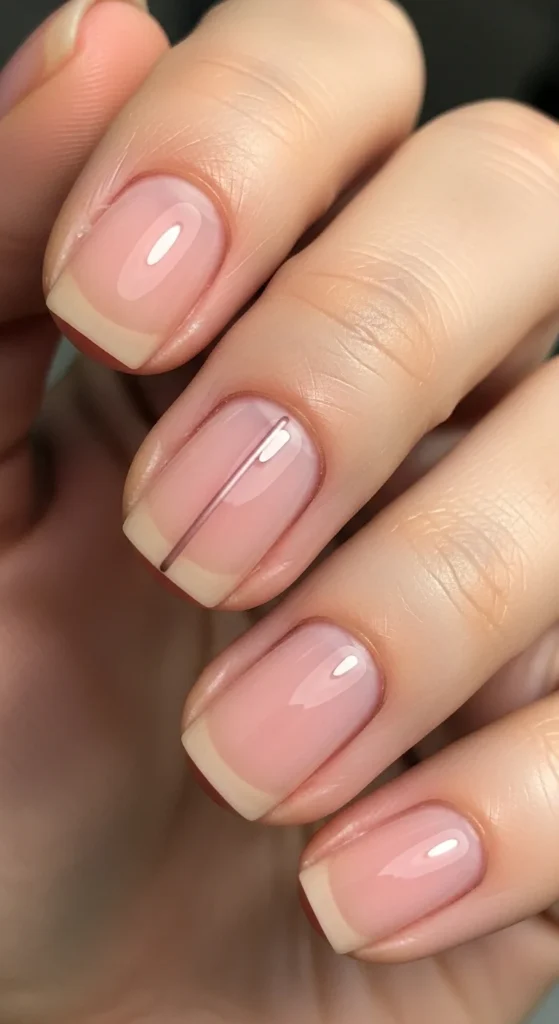
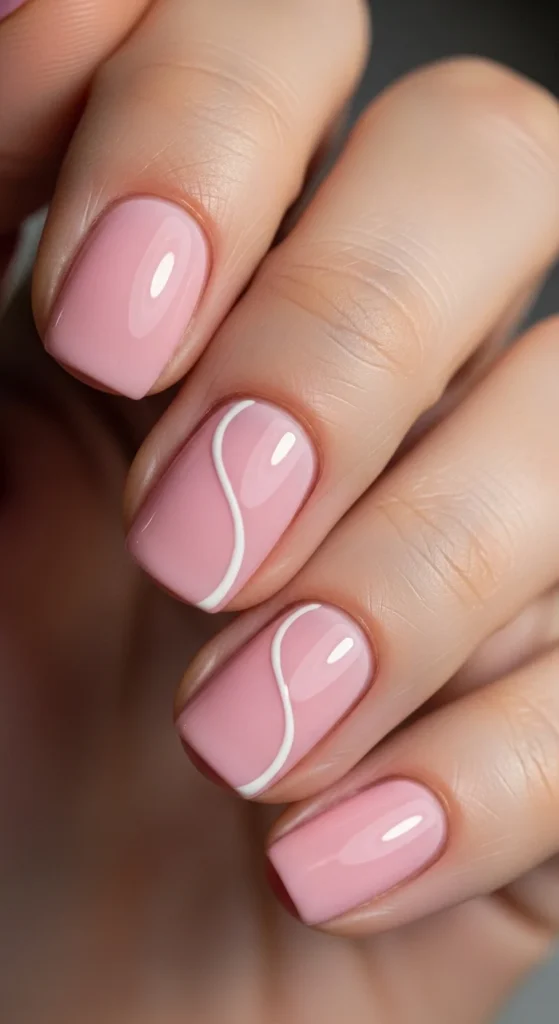
19. Center Line Accent (Vertical Stripe)
A vertical line can make short nails look longer. Paint a blush or nude base. Add a thin vertical line on one or two nails using metallic silver or soft white.
DIY tip: rest your hand on a table while drawing the line. Use a striping brush or nail pen.
Budget-friendly tip: if the line wobbles, keep it on just one nail and let it look abstract. Seal with top coat.
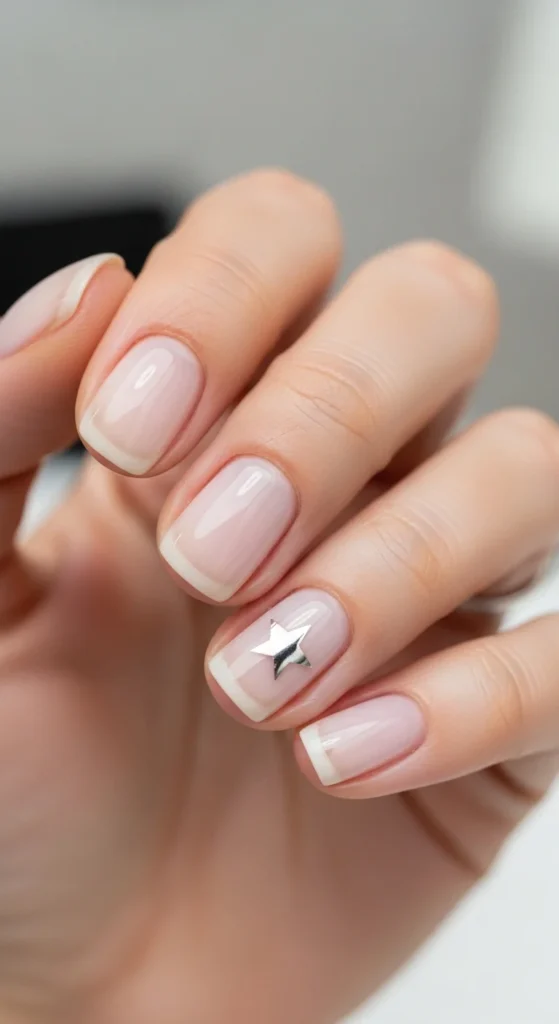
20. Sticker Accent Over Milky Base
If you want nail art without effort, stickers are your best friend. Apply a milky base. Add one tiny sticker (star, dot, or mini shape) to one nail. Seal with top coat.
DIY tip: press the sticker down firmly so edges don’t lift. Add two layers of top coat if needed.
Budget-friendly tip: stationery stickers can work if they are very small and sealed well. Keep the rest of the nails plain so the design stays clean on short nails.
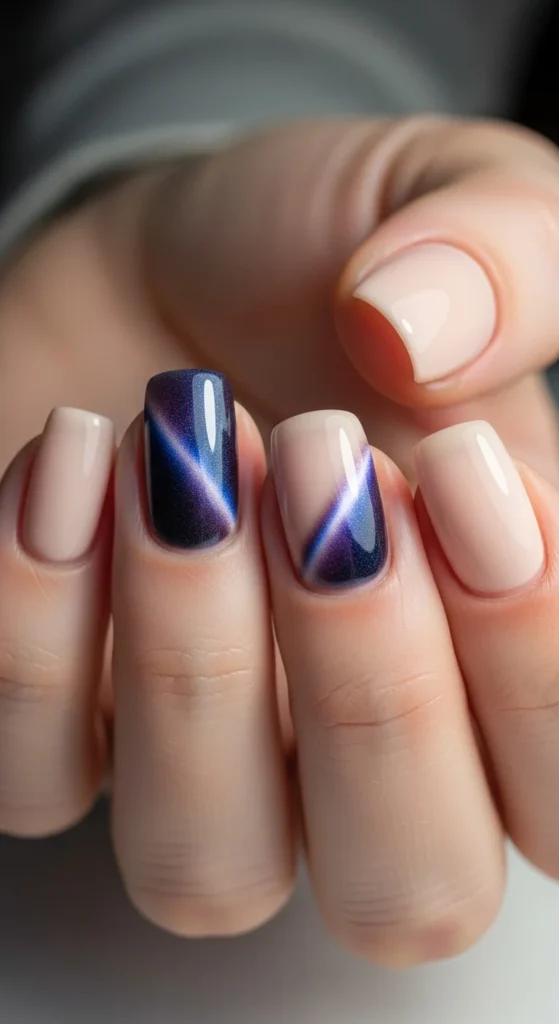
21. Short Cat-Eye Accent Nails (Cool-Toned)
Cat-eye polish can look stunning on short nails if you use it as an accent. Paint most nails nude or taupe. Use cat-eye polish on two nails only. Use the magnet to create a soft diagonal glow.
DIY tip: keep the glow subtle. Short nails look best with one clear magnetic line, not multiple effects.
Budget-friendly tip: many affordable magnetic polishes work well if you use thin coats. Always seal with top coat to keep the finish smooth.
22. Soft Short Ombré (Milky Fade)
Short ombré can look very clean when the fade is gentle. Use two close shades like milky pink and nude. Dab polish onto a makeup sponge and tap lightly onto the nail to create a soft fade. Repeat in thin layers.
DIY tip: keep the fade subtle. Too much contrast can look harsh on short nails. Clean up edges with a small brush dipped in remover.
Budget-friendly tip: use polishes you already have—two nudes often work better than bold colors for short nails. Seal with glossy top coat for a smooth finish.
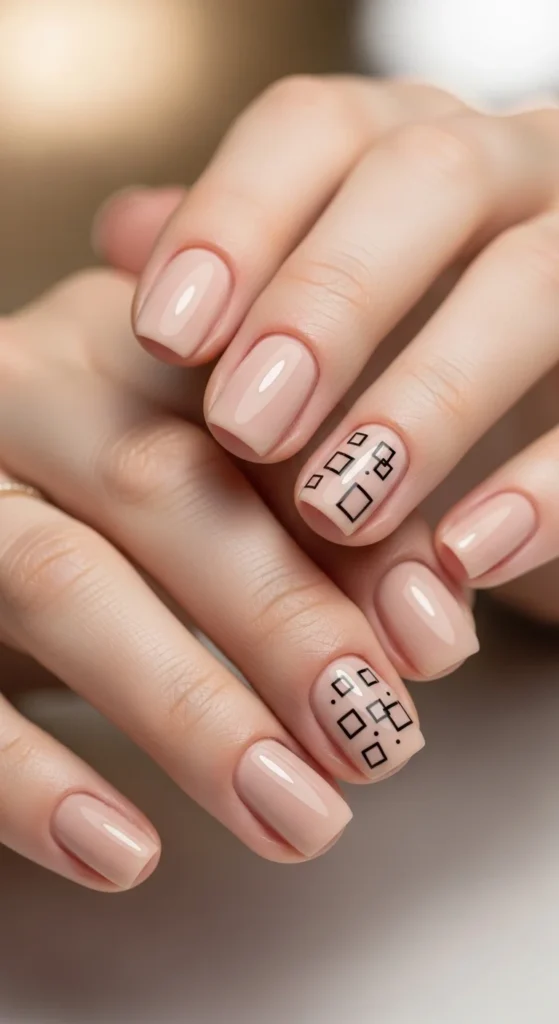
23. Micro Geometry (Tiny Squares or Dots)
Tiny geometric shapes look modern on short nails when kept minimal. Apply a nude base. Add one or two tiny squares or dots on one nail using a toothpick or fine brush.
DIY tip: choose one shape only. Repeating too many shapes can look busy on short nails. Finish with top coat.
Budget-friendly tip: you can use a thin strip of tape to create a tiny square outline, then fill it lightly with polish.
24. Minimal Swirl Accent (One Nail Swirl)
Swirl designs can overwhelm short nails if you do too much. Keep it to one nail. Paint a soft base, then draw one curved swirl line in white or beige using a thin brush.
DIY tip: practice one swirl on paper first. Keep it simple—one curve is enough. Seal with top coat to smooth the line.
Budget-friendly tip: a toothpick can draw a swirl if you use very little polish. This design looks stylish even when it’s not perfectly uniform.
25. Clear Gloss + Cuticle Care Manicure
This proves length doesn’t matter because neat grooming is the star. Shape nails into short round or oval. Apply base coat, then clear gloss. Focus on tidy cuticles and hydrated skin.
DIY tip: use cuticle oil daily and push cuticles back gently after a shower. A clean outline around the nail makes short nails look very polished.
Budget-friendly tip: clear polish and oil can cost less than one salon visit and still look chic. If you want a tiny detail, add one micro dot on the ring finger.
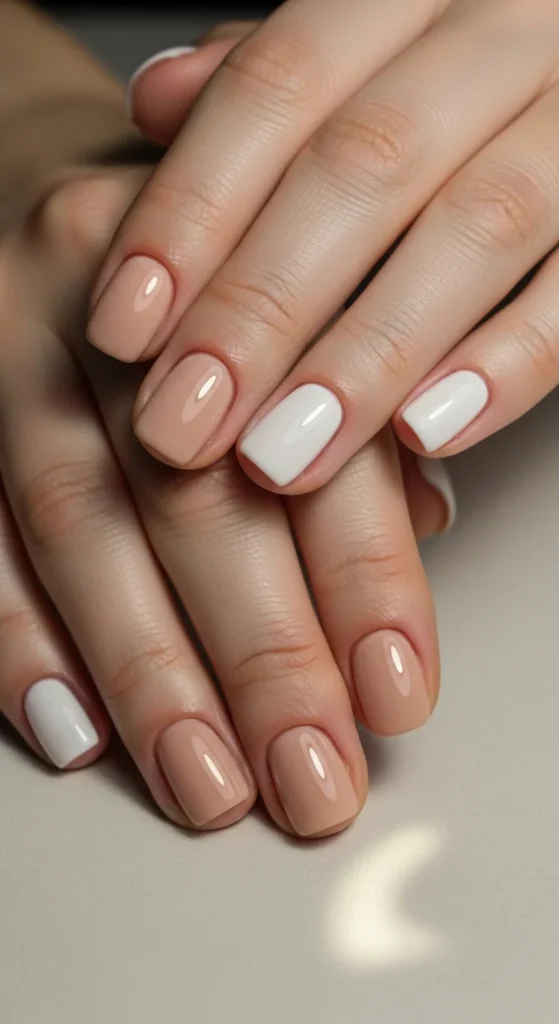
26. Alternating Neutrals (Nude + Soft White Mix)
Alternating shades is simple, modern, and short-nail friendly. Choose two calm shades like nude and soft white. Paint alternating nails. Keep coats thin and finish with top coat.
DIY tip: pick shades with similar depth so the contrast feels smooth, not harsh. This manicure looks clean even after several days because the colors are forgiving.
Budget-friendly tip: if you don’t have soft white, use a milky nude as the second color. The look still works and keeps the nails looking tidy and wearable.
Conclusion
Short nails can look chic with the right scale—micro tips, soft neutrals, gentle shine, and small accents that suit a natural-length canvas. Try one design this week, keep your layers thin, and finish with a good top coat. Save your favorite ideas and rotate them as your nails grow. Short nails can look stylish every day—no extra length required.

Leave a Reply