
Dark circles, redness, little surprise blemishes—we all have them. The good news? Concealer can instantly wake up your face if you use it the right way. This isn’t about piling on product or masking your skin. It’s about smart placement, the right shades, and a few pro techniques that make you look naturally bright, fresh, and well-rested ✨
Step 1: Start With Skin Prep (Don’t Skip This)
If concealer ever looks dry, cakey, or creasy on you, prep is usually the culprit—not the product.
Before you even open your concealer:
- Cleanse your face to remove oil and residue
- Apply a lightweight moisturizer, especially under the eyes
- Let it sink in for 2–3 minutes
- Optional but powerful: a tiny amount of primer or beauty oil for extra grip
Think of this as creating a smooth canvas. Concealer sticks better, blends easier, and looks more skin-like when your base is hydrated.
Step 2: Choose the Right Shade for Each Job
One concealer shade does not fit all. For a bright, lifted look, use shades strategically.
Here’s the simple rule:
- Under eyes: 1–2 shades lighter than your skin tone
- Blemishes & redness: Match your exact skin tone
- Brightening points (nose bridge, chin): Slightly lighter shade
If you struggle with blue or purple dark circles, add an extra step:
- Use a peach or salmon color corrector first
- Apply only where the darkness is strongest
- Let it settle, then layer concealer on top
This prevents that gray, tired look and keeps coverage natural.
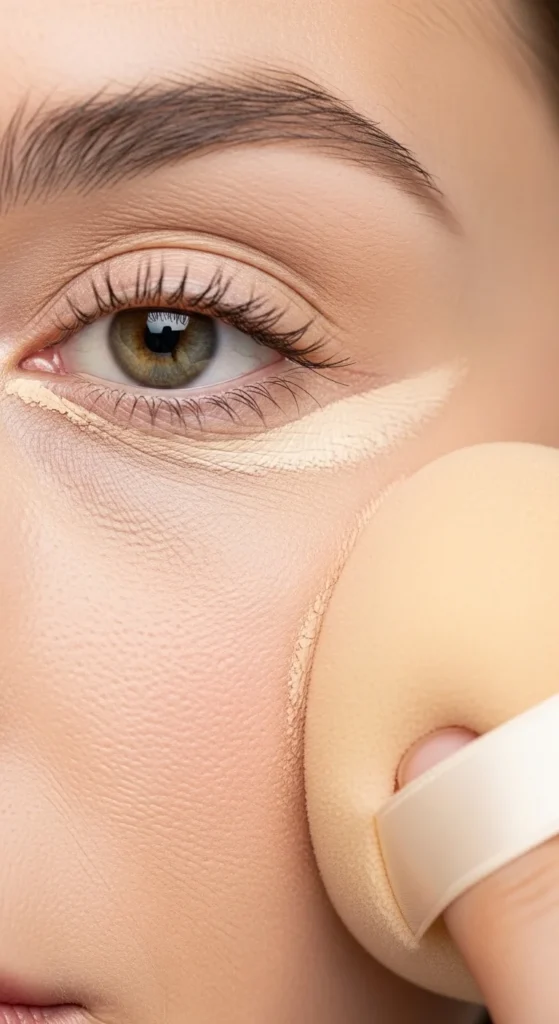
Step 3: Use the Triangle Technique for Lifted Under Eyes
Instead of swiping concealer all the way across your under-eye area (a common mistake), try this pro-approved method.
Apply concealer in:
- The inner corner
- The outer corner
- A small triangle shape pointing downward
Then blend outwards and slightly upward. This brightens the face and gives a subtle lifting effect without emphasizing fine lines.
Important tip:
Use less product toward the outer eye where wrinkles tend to show more.
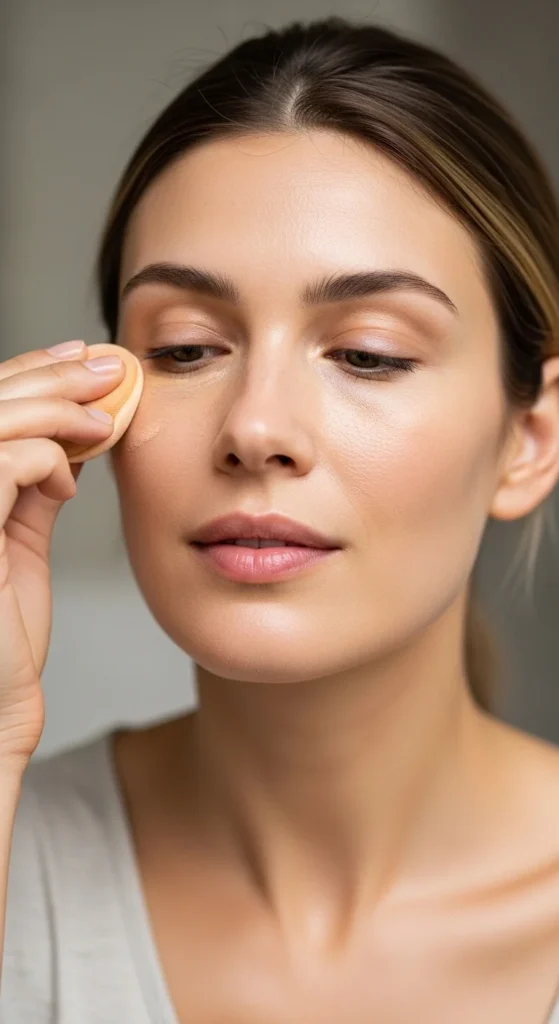
Step 4: Blend Gently (Pat, Don’t Rub)
Blending makes or breaks concealer.
Best tools:
- Ring finger: warms product for a sheer, skin-like finish
- Damp sponge: gives smoother, fuller coverage without heaviness
- Small brush: perfect for pinpoint blemishes
Always:
- Pat or dab—never rub
- Blend slowly to avoid irritation
- Wash hands before finger application (small step, big difference)
If you want more coverage, let the first layer set for a few seconds, then build gently. Thin layers = no cake.
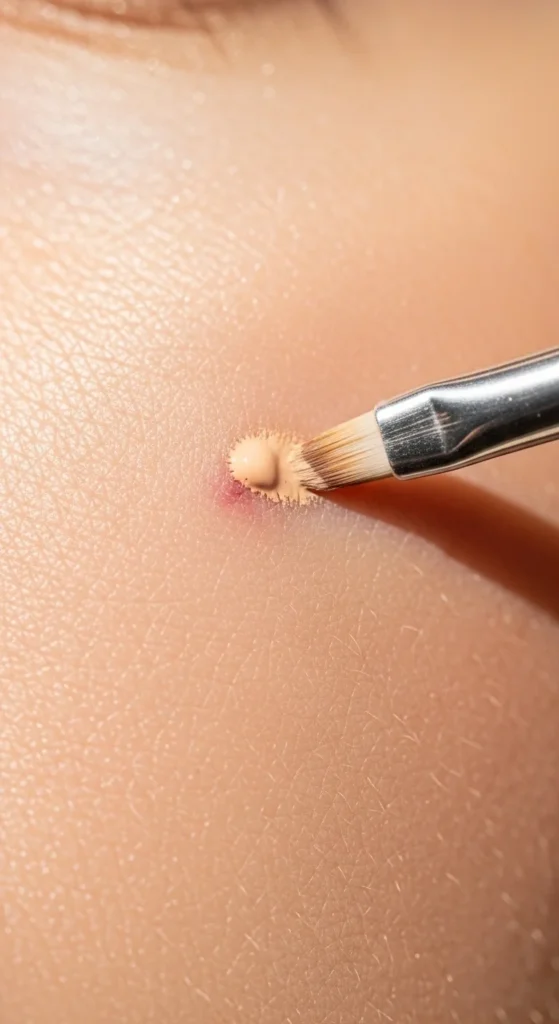
Step 5: Spot-Conceal Like a Pro
For blemishes, redness, or pigmentation:
- Apply concealer only on the discolored area
- Let it sit for 10–15 seconds
- Tap the edges to blend, keeping the center intact
This trick boosts coverage without adding extra product. If needed, lightly set and repeat for stubborn spots.
Step 6: Set Strategically for a Crease-Free Finish
Powder is your friend—when used correctly.
To set concealer:
- Use a finely milled translucent powder
- Pick up a tiny amount
- Press (don’t swipe) onto concealed areas
Under the eyes, focus on creasing zones only. Too much powder can make skin look dry or emphasize texture.
For extra longevity:
- Try alternating thin layers of concealer and powder
- Especially helpful for events or long days
Step 7: Brighten High Points for a Fresh Glow
Concealer isn’t just for covering—it’s also a subtle sculpting tool.
Apply a lighter concealer to:
- Bridge of the nose
- Center of the forehead
- Chin
- Inner corners of the eyes
Blend softly and keep it natural. This trick adds dimension and makes your face look instantly awake without heavy makeup.
Common Mistakes to Avoid
- Using too much product under the eyes
- Applying concealer on dry, unprepped skin
- Rubbing instead of patting
- Using one shade everywhere
- Setting with thick layers of powder
Remember: less is more when it comes to bright, natural-looking concealer.
Final Takeaway
Concealer isn’t about hiding your skin—it’s about enhancing it. With the right prep, smart shade choices, and gentle techniques, you can brighten your face in minutes and still look like you.
Save this guide for later, try one new tip at a time, and watch your concealer game completely level up 💡✨

Leave a Reply