
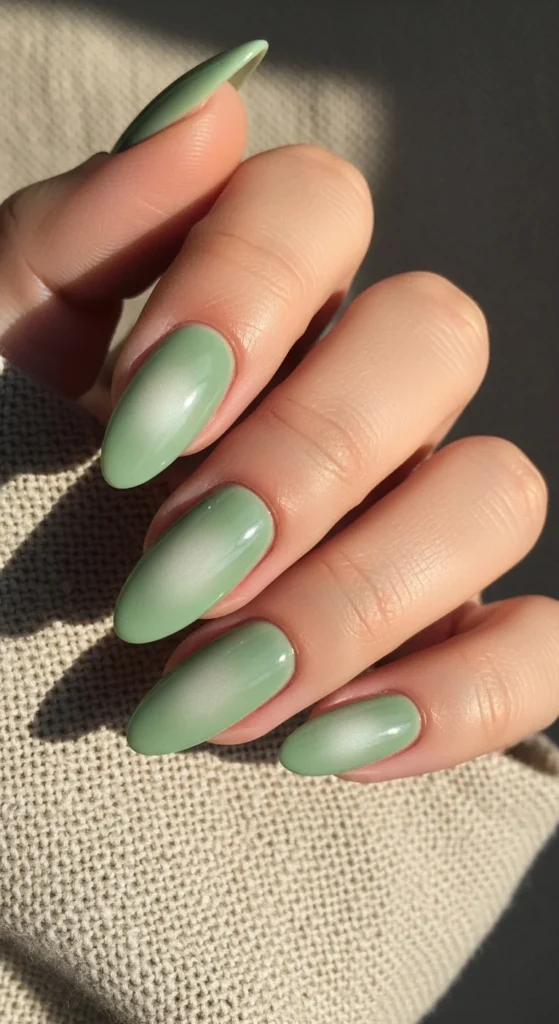
Green nails are everywhere right now because they can look soft and minimal or rich and dramatic, depending on the shade and finish. Pastel greens like pistachio and mint feel light for spring, while olive, forest, and emerald read earthy and polished for fall and winter. Green also pairs beautifully with popular nail art techniques like aura halos, chrome outlines, marble veining, and simple French tips.
If you worry green will clash with outfits, start with sage or olive. They act like neutrals. If you want a bolder look, emerald chrome or neon lime can still feel wearable when you keep the design simple and focus on one accent nail.
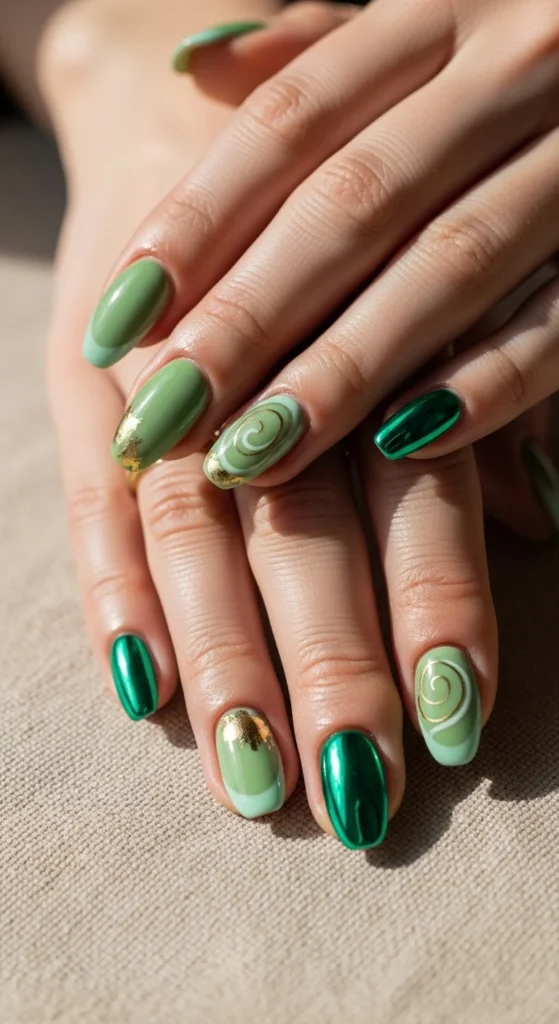
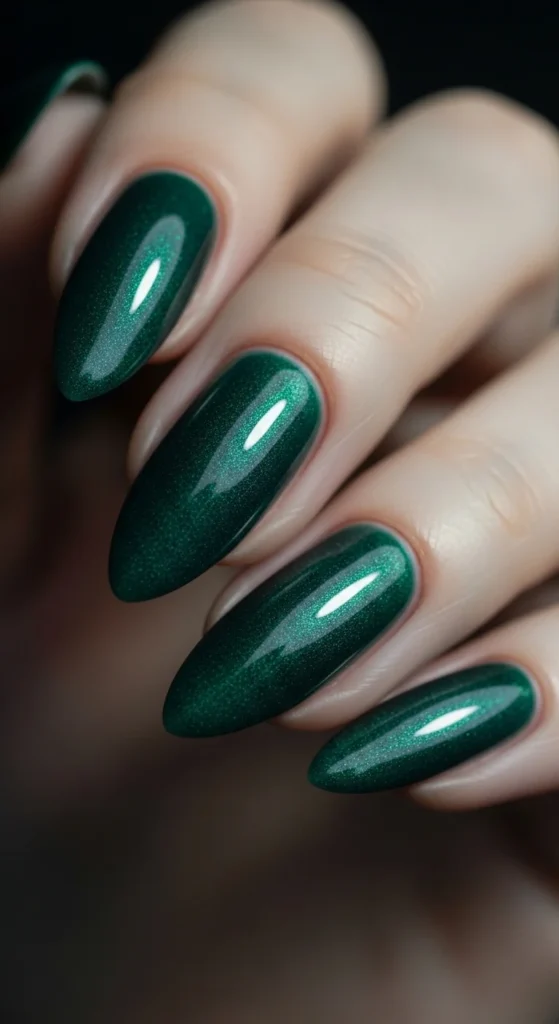
1. Emerald Chrome Mirror Nails
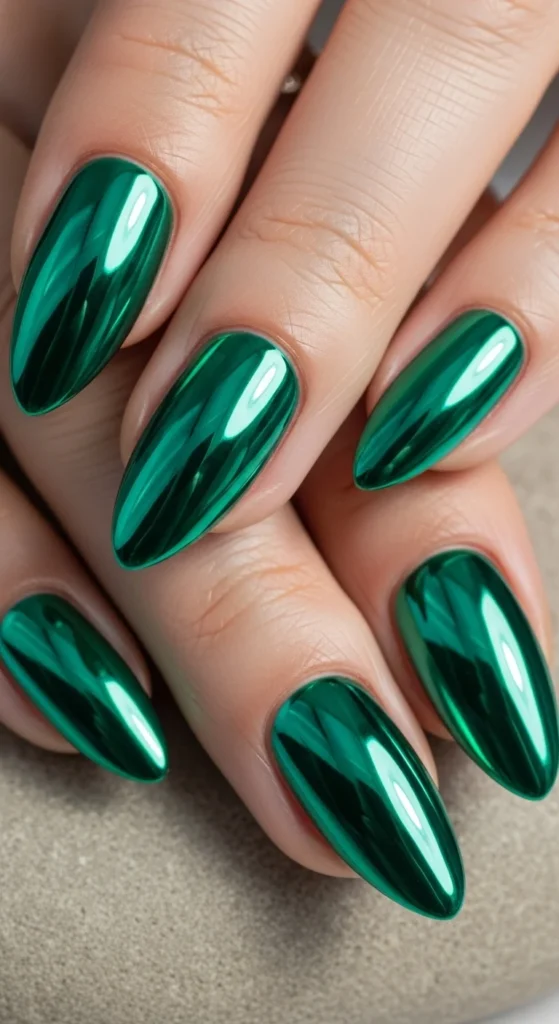
Emerald chrome is the “jewelry” version of green nails. It looks luxe even when the design is simple. The shine does most of the work, so you don’t need extra art.
For DIY, paint a deep emerald base first. Let it fully dry. If you’re using chrome powder, rub it lightly over a tacky top coat for that mirror effect. If you don’t have powder, use a metallic emerald polish as a shortcut. It won’t be full mirror, but it still looks glossy and bold.
Keep nails almond or short squoval for a clean shape that shows off the shine.
Budget tip: do chrome on two accent nails and keep the rest solid emerald. You’ll use less product and it still looks intentional.
Finish with a strong top coat and wrap the tips. Chrome looks best when edges stay crisp.
2. Pistachio Jelly Minimal Nails
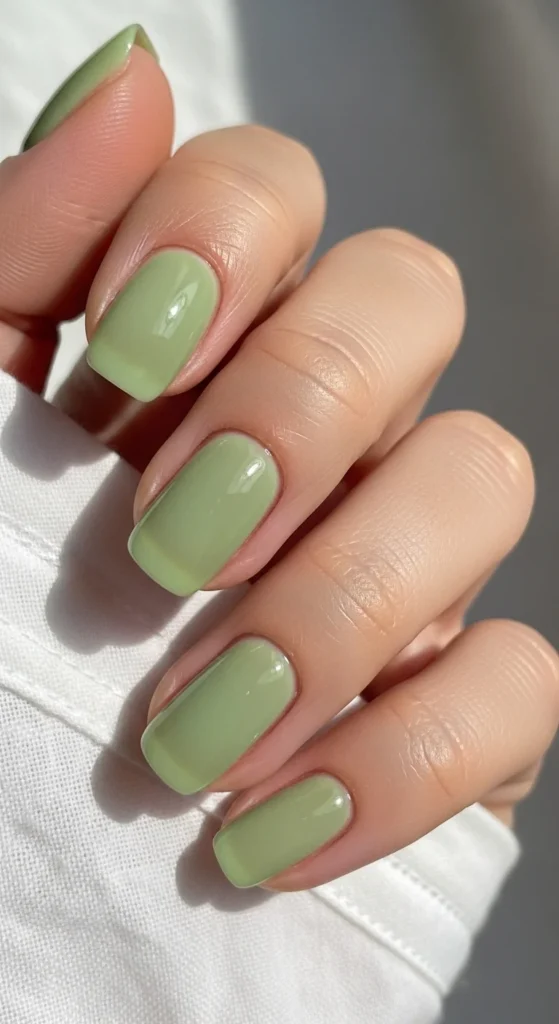
Pistachio is the soft green that feels “clean” and easy to wear. The jelly finish makes it even more forgiving because it’s slightly see-through, so small streaks won’t stand out.
Apply a clear base coat first. Then use one thin coat of pistachio for a barely-there tint. Add a second coat if you want it a little stronger, but keep it sheer.
This look is great for short nails because it makes them look neat and cared for without trying too hard.
Budget tip: if you don’t own pistachio, mix one tiny drop of green into a clear top coat and test it on one nail. Adjust until it looks softly tinted.
Finish with glossy top coat for that smooth “glass” look.
3. Sage Green with Gold Foil Flecks
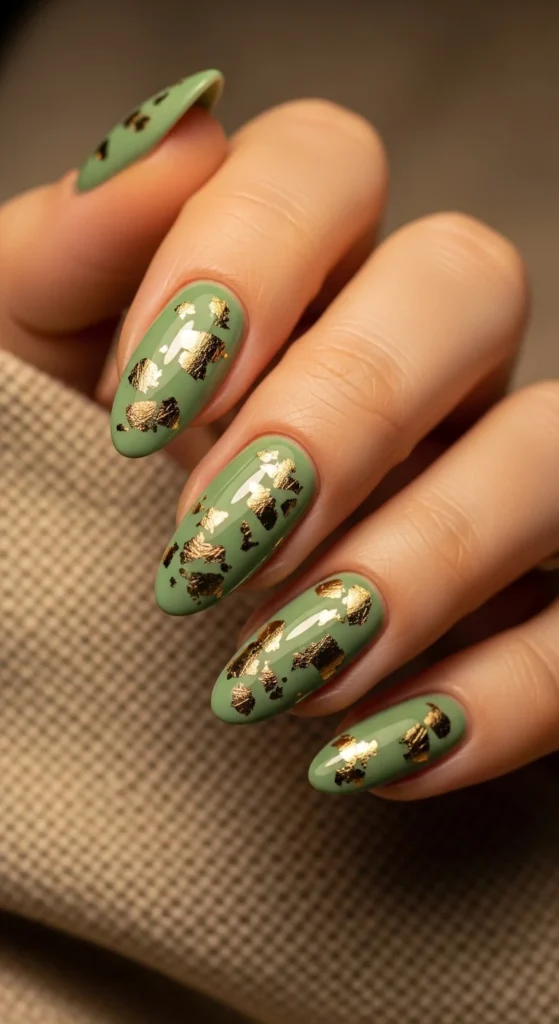
Sage green is one of the easiest greens to wear because it feels muted and earthy. Add tiny gold foil flecks and it instantly looks more dressed up, without becoming busy.
Paint nails sage green in two thin coats. While the second coat is slightly tacky, press on small pieces of gold foil. Keep the foil sparse. A few flecks per nail looks clean and expensive.
If you want it simpler, do foil on one or two accent nails only.
Budget tip: craft foil works fine. Cut or tear it into tiny pieces so it looks delicate.
Seal with two layers of top coat so foil edges feel smooth and don’t lift.
4. Forest Green Matte “Velvet Depth”

Matte forest green feels calm and sophisticated. It gives the depth of dark green without the shine, which makes it look modern.
Apply forest green polish first. Let it dry fully. Then use a matte top coat. Matte shows texture, so it looks best when nails are smoothly buffed and shaped.
If full dark green feels too strong, keep nails short and square or short squoval. That makes the look more everyday.
Budget tip: matte top coat is a smart buy because it changes any polish you already have.
To keep matte looking clean, avoid heavy oils right after painting. Once it sets, use cuticle oil as normal.
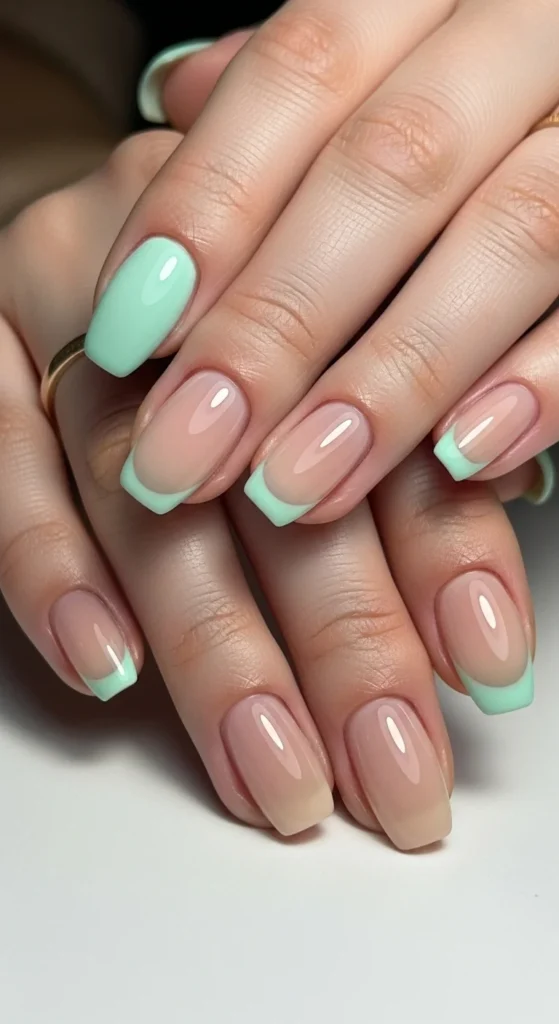
5. Mint Micro French Tips
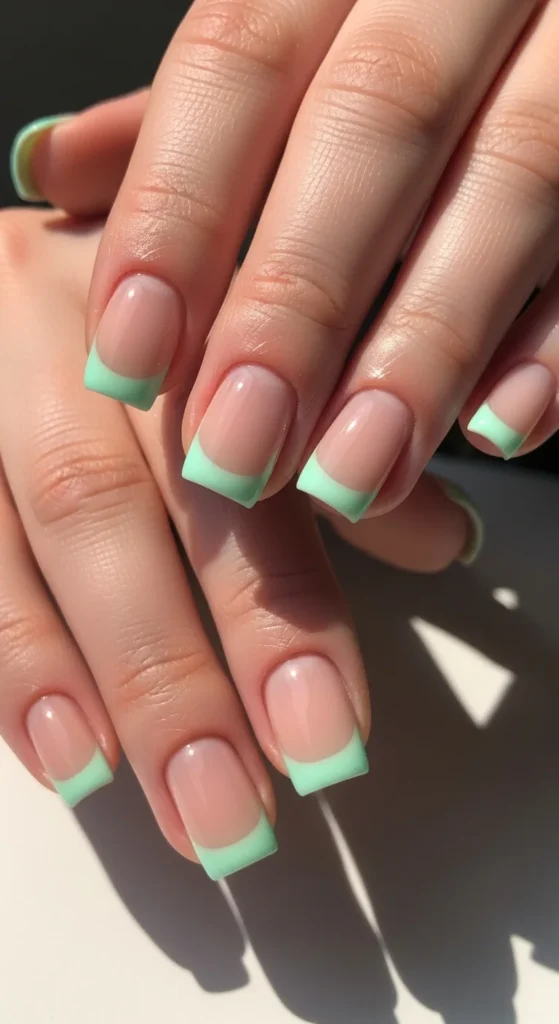
Mint micro tips are the “clean girl” way to wear green. The nude base keeps it subtle, and the thin mint line adds just enough color.
Use a sheer nude base. Let it dry. Then draw a thin mint line across the tip with a striping brush. Keep it delicate.
If you’re not confident freehand, use French tip guide stickers. They’re cheap and help you get a clean curve.
Budget tip: do micro tips on all nails, or just on two nails if you want a softer look. Either way works.
Finish with glossy top coat so the tips look crisp.
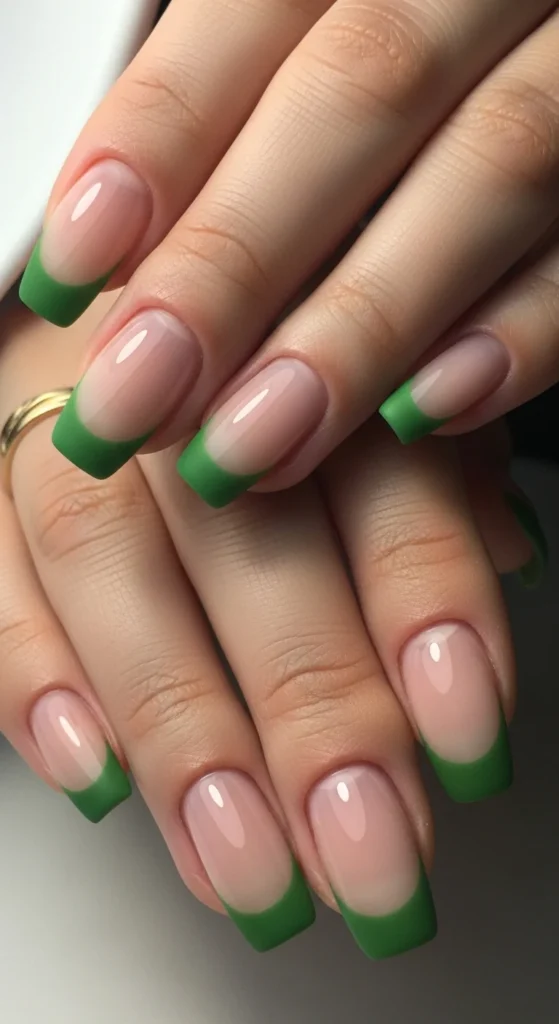
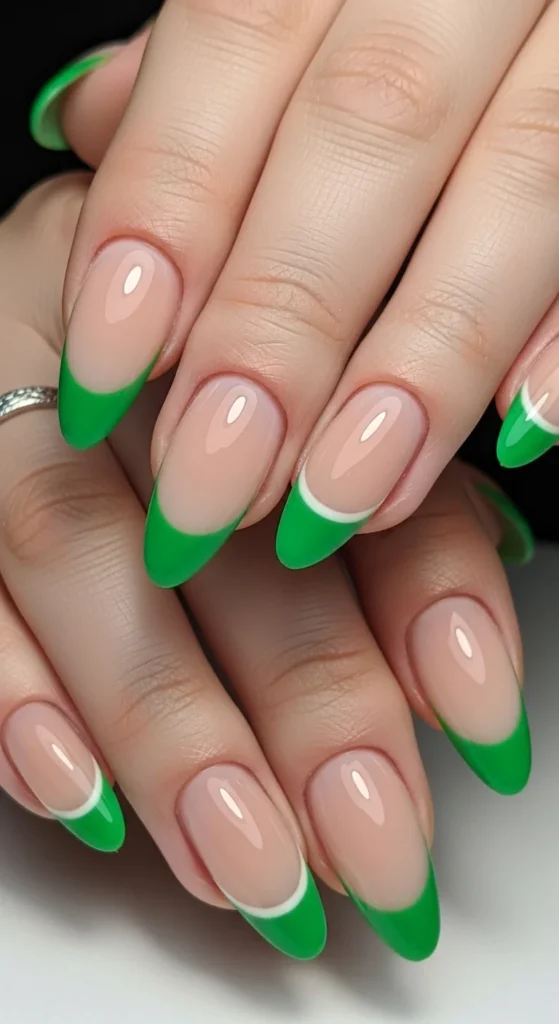
6. Olive French Tips for Neutral Greens
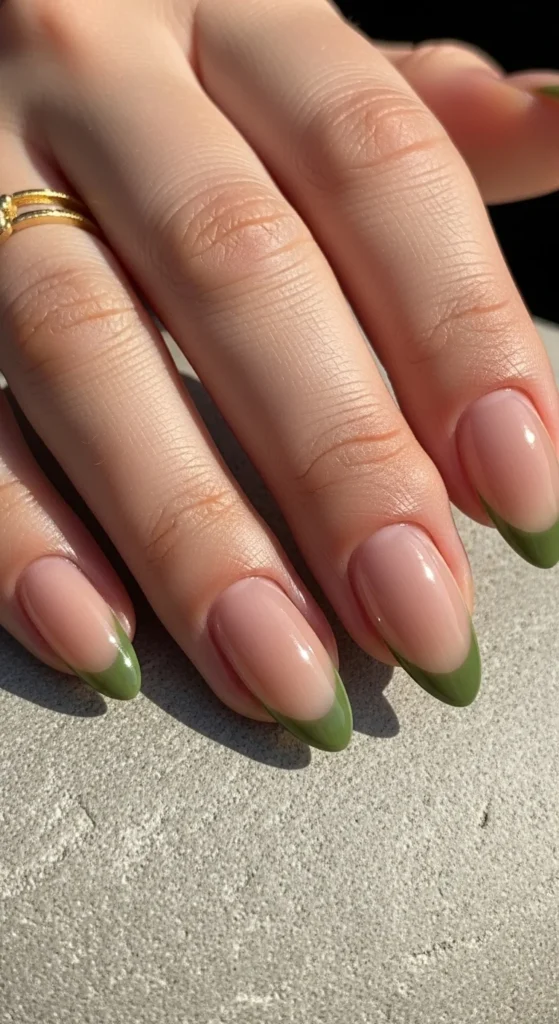
Olive is the green that matches outfits the easiest. It feels earthy, not neon. As a French tip, it looks modern and wearable.
Start with a nude base. Add olive tips in a soft curve. Almond shape looks especially clean with this style.
Budget tip: if olive tips feel too bold, make them micro tips instead. Thin lines look more subtle and still stylish.
Seal with glossy top coat and wrap the tips to help prevent chipping.
7. Matcha Green French with Soft Contrast
Matcha green sits between sage and olive. It’s muted, modern, and looks great on short nails.
Do a sheer nude base, then add matcha tips. Keep the tip line thin and clean.
If you want extra detail, add one tiny dot of white near the cuticle on the ring finger. It gives a small “design moment” without clutter.
Budget tip: use a toothpick for the dot and a thin brush for the tip.
Finish with top coat for a smooth look.
8. Aura Green Swirls with Gold Shift
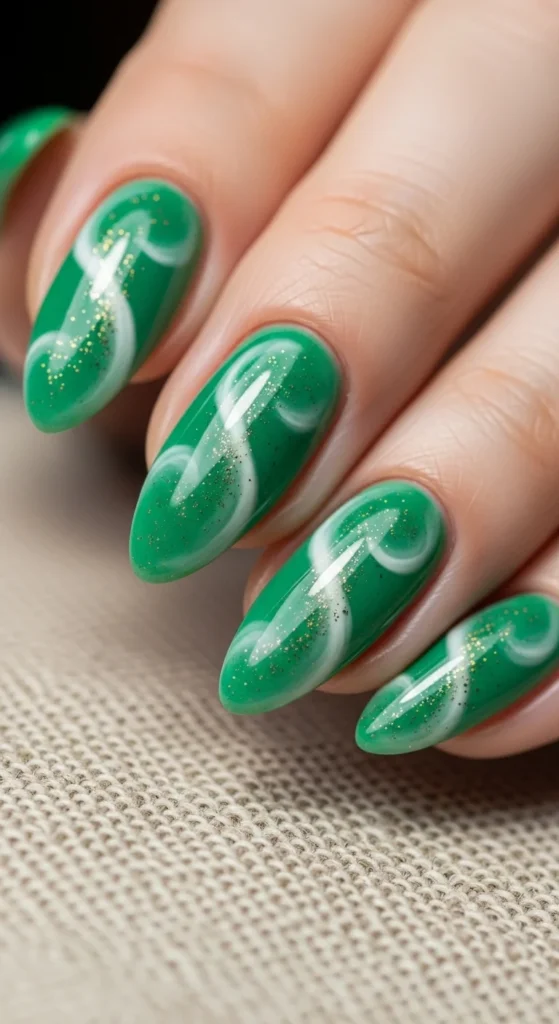
Aura swirls look dreamy because the color looks like it’s moving. Green with a hint of gold shimmer feels ethereal and still wearable.
Use a sheer nude base first. Dab light green in the center with a sponge to create the glow. Then add a thin swirl line in a deeper green on one or two nails.
If you want the gold shift, use a sheer gold shimmer topper lightly over the aura nails.
Budget tip: you can fake the “gold shift” with a light champagne shimmer topper if that’s what you already own.
Seal with glossy top coat to smooth everything out.
9. Jade Leaf Motif Accent Nail
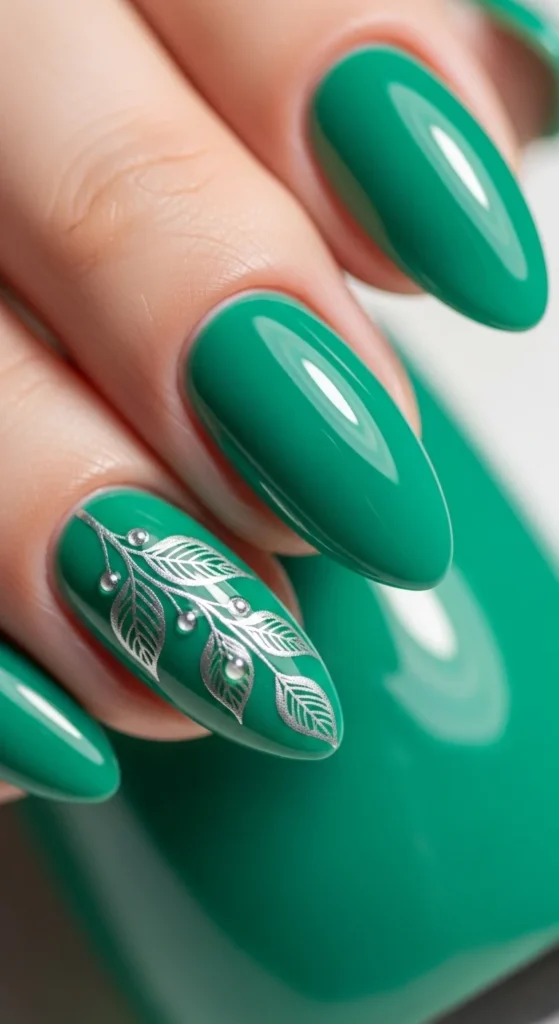
Leaf details make green nails feel intentional and nature-inspired without being too busy.
Paint most nails jade green. On one accent nail, use a nude base and paint a small leaf branch with a thin brush. Keep it simple. Two or three leaves is enough.
If hand painting feels hard, leaf stickers are an easy shortcut.
Budget tip: do the leaf on only one nail and keep the rest solid jade. That saves time and still looks polished.
Finish with top coat so the leaf art looks sealed and smooth.
10. Hunter Green Marble Veining
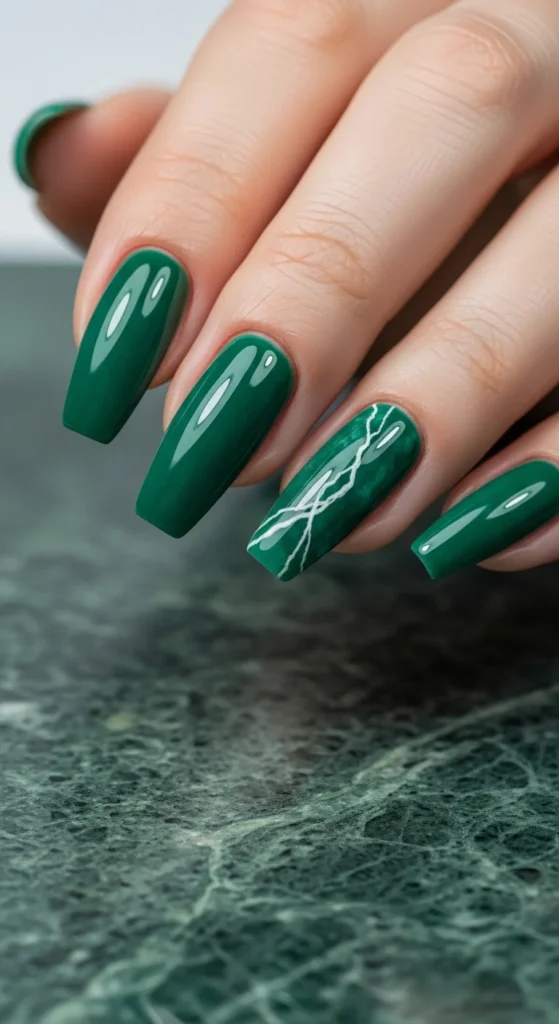
Green marble looks rich and a little dramatic. Hunter green gives depth, and white veins add contrast.
Paint hunter green base. For an accent nail, use a thin brush to draw wispy white lines. Lightly blur them with a sponge to soften.
Keep marble on one or two nails. Full marble on every nail can look heavy.
Budget tip: marble stickers work well and look clean if you’re not comfortable painting veins.
Seal with glossy top coat for a smooth stone finish.
11. Kelly Green “Lucky Accent” Nails
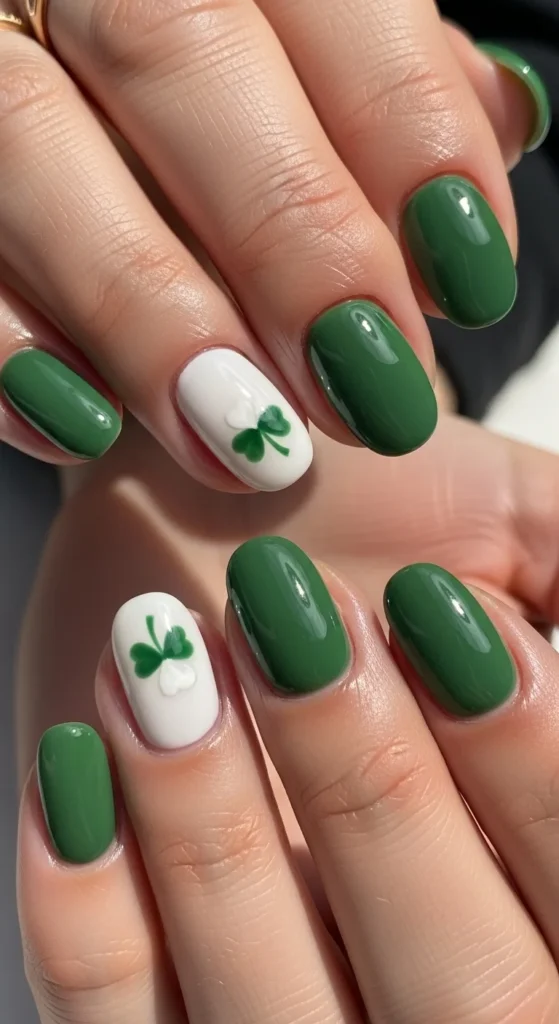
Kelly green is bold and fun. If it feels too bright for daily wear, keep it simple and add a tiny accent.
Paint most nails kelly green. Add a small shamrock or tiny dot cluster on one nail. Keep it minimal so it still looks chic.
Budget tip: use nail stickers for clean shapes without effort.
Finish with glossy top coat. Bright greens look best with shine.
12. Neon Lime Gradient Fade
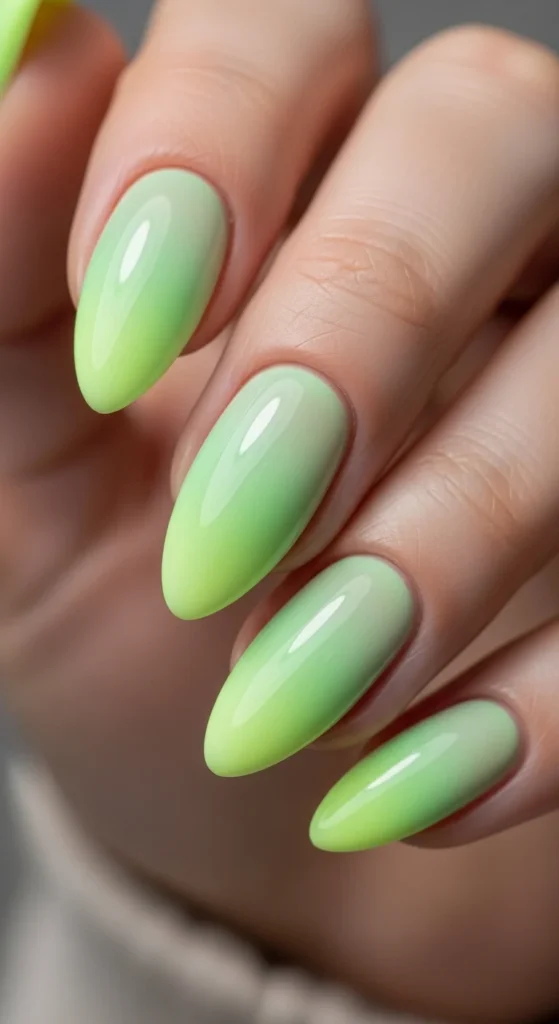
A neon lime fade gives you bold color without committing to full neon on every nail. It’s perfect for summer.
Start with a pale green base. Use a sponge to dab neon lime near the tips. Build slowly so the fade looks smooth.
Budget tip: do the gradient on two nails only, and keep the others a soft green. It looks balanced and saves time.
Seal with glossy top coat to smooth the sponge texture.
13. Neon Lime Glitter Tip Edges
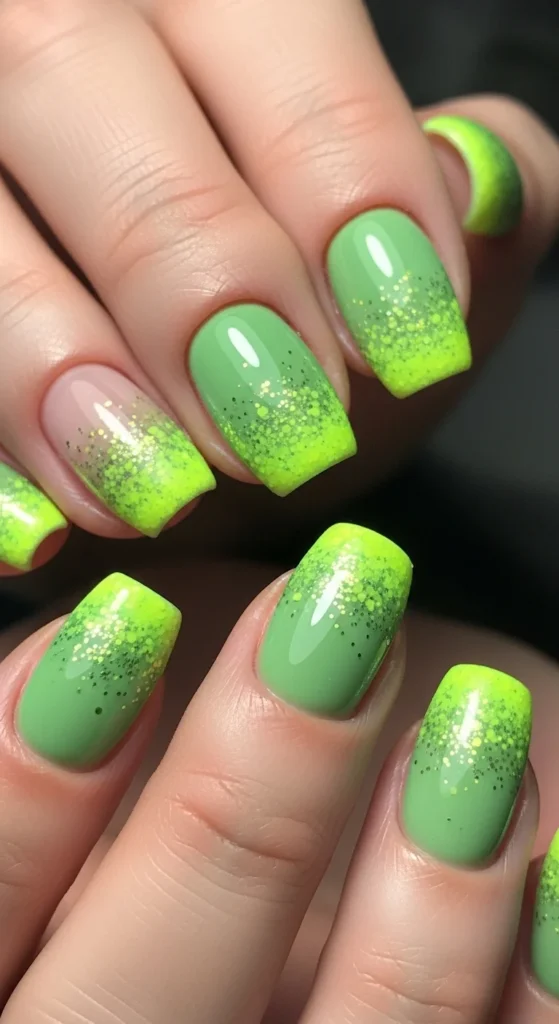
This is a fun “sparkly edge” design that still feels neat.
Paint nails a pale green or nude base. Add neon lime glitter just on the tips like a French tip, but glitter.
If you don’t have lime glitter, use a clear glitter topper over neon polish at the tips.
Budget tip: keep glitter on only the ring finger and thumb for a simple accent set.
Seal with two coats of top coat so glitter feels smooth.
14. Seafoam Ombre Coastal Fade
Seafoam ombre feels calm and beachy. It’s a softer green that looks great in spring and summer.
Use a sheer nude base. Dab seafoam on the tips with a sponge, then add a hint of aqua toward the edge for depth.
Budget tip: if you only have one green, create a lighter shade by mixing it with white polish.
Finish with glossy top coat for a smooth fade.
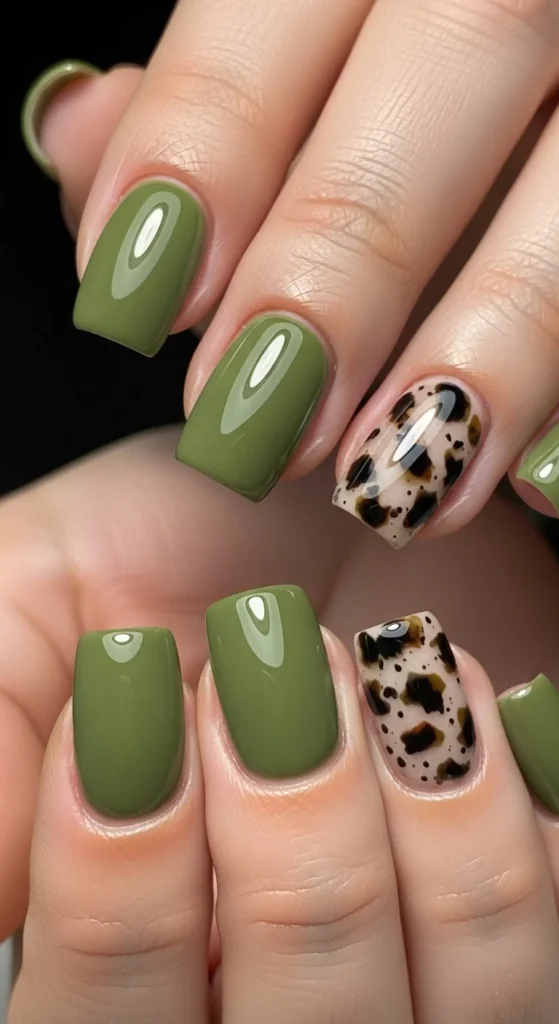
15. Moss Green Leopard Accent
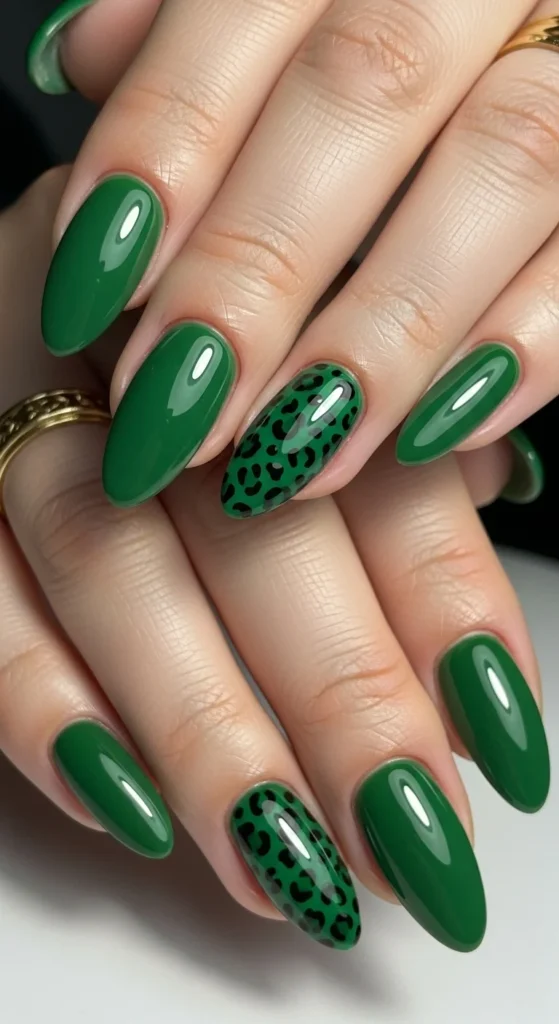
Animal print works surprisingly well in green when you keep it muted. Moss green leopard feels earthy and stylish.
Paint most nails moss green. For the accent nail, use a lighter green base and add irregular spots in darker green and black.
Budget tip: use leopard print stickers if freehand feels hard.
Keep it to one nail so the look stays clean.
Seal with top coat.
16. Chartreuse Geometric Lines

Chartreuse is bold, so geometric shapes help it look sharp instead of messy.
Use a nude base and apply striping tape to create triangles or angled blocks. Paint chartreuse in the open sections, then peel tape carefully.
Budget tip: do geometric art on two nails only and keep the rest solid nude or soft green. That makes it wearable.
Finish with glossy top coat for a smooth surface.
17. Dark Emerald with Cuticle Rhinestones
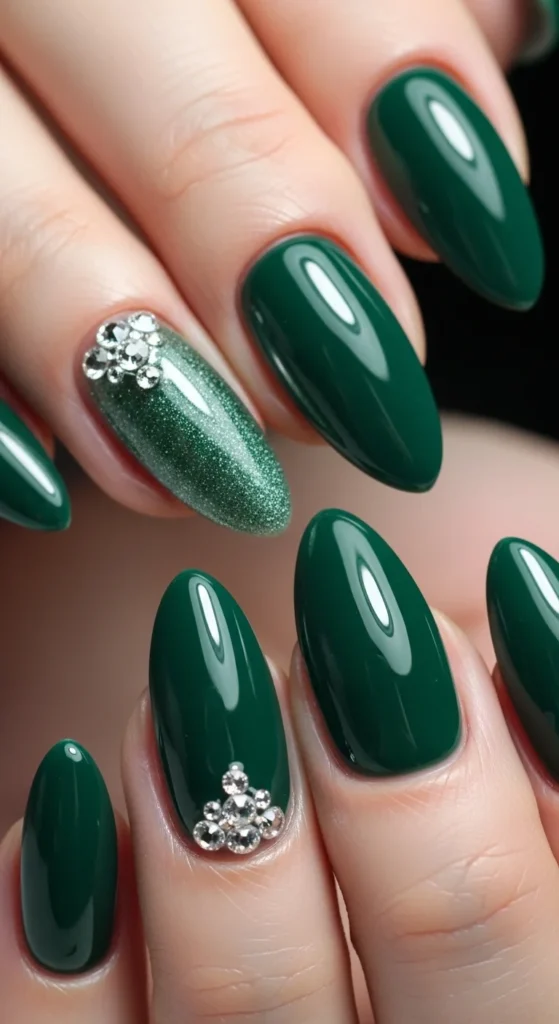
Rhinestones add glamour without needing complicated art. Dark emerald looks rich, and tiny gems near the cuticle make it look dressed up.
Paint nails dark emerald. On one nail, place 2–4 tiny rhinestones near the cuticle using nail glue.
Budget tip: choose very small flat gems so they don’t snag. A single gem can look just as good as many.
Seal around the gems with top coat to help them stay in place.
18. Velvet Dark Green Magnetic Finish
Velvet magnetic polish creates a soft, fabric-like shine that moves with the light. It looks rich without glitter.
Apply the magnetic polish one nail at a time and use the magnet close to the nail to pull the shimmer into a soft stripe.
Budget tip: keep velvet effect on two nails and do solid dark green on the rest. It still looks cohesive and saves time.
Seal with glossy top coat.
19. Pear Green Delicate Dot Scatter
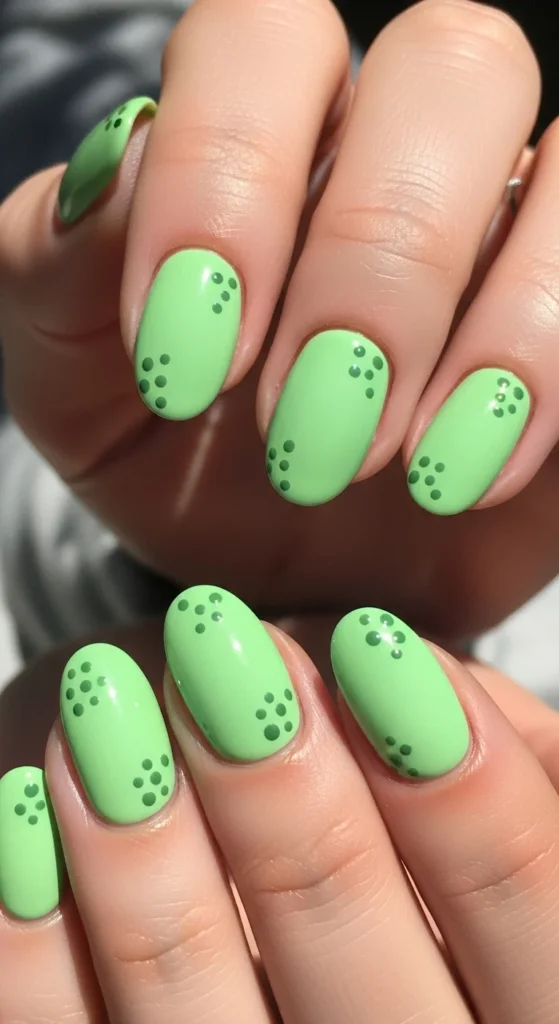
Tiny dots keep green nails playful and easy. Pear green is light and wearable, and dot art is beginner friendly.
Paint nails pear green. Add small dots in a darker green near the tips or along one side. Keep dots tiny.
Budget tip: use a toothpick for dots. Just wipe it often so dots stay crisp.
Seal with glossy top coat to keep the surface smooth.
20. Artichaut “Brat Summer” Green
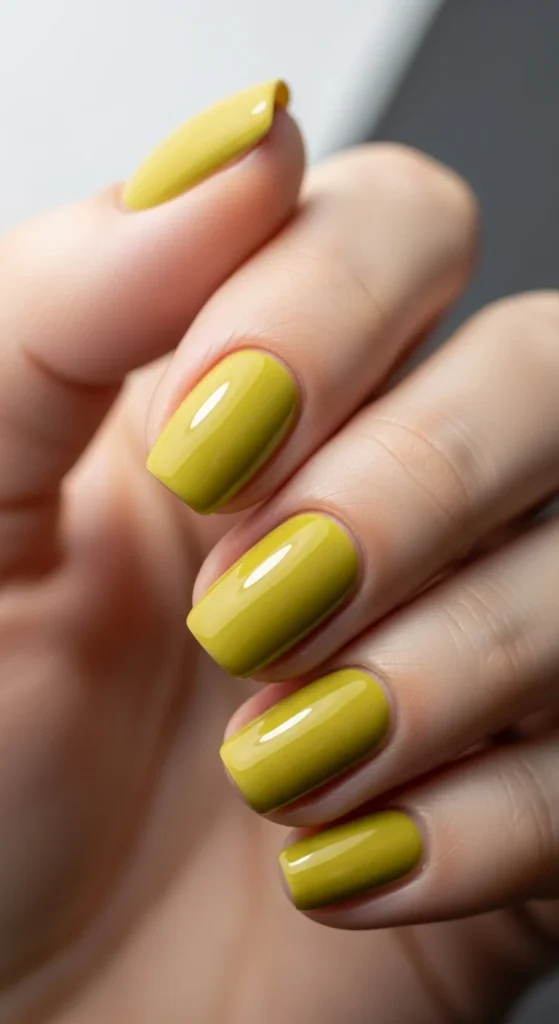
This warm, slightly yellow-leaning green feels bold and playful. If it feels too loud, keep nails short and the design simple.
A solid glossy manicure is enough. Add one tiny white dot or thin line on one nail if you want a small detail.
Budget tip: short nails make bold shades feel more wearable.
Seal with glossy top coat and wrap tips to avoid chips.
21. Bright “Brazil Pop” Green Nails
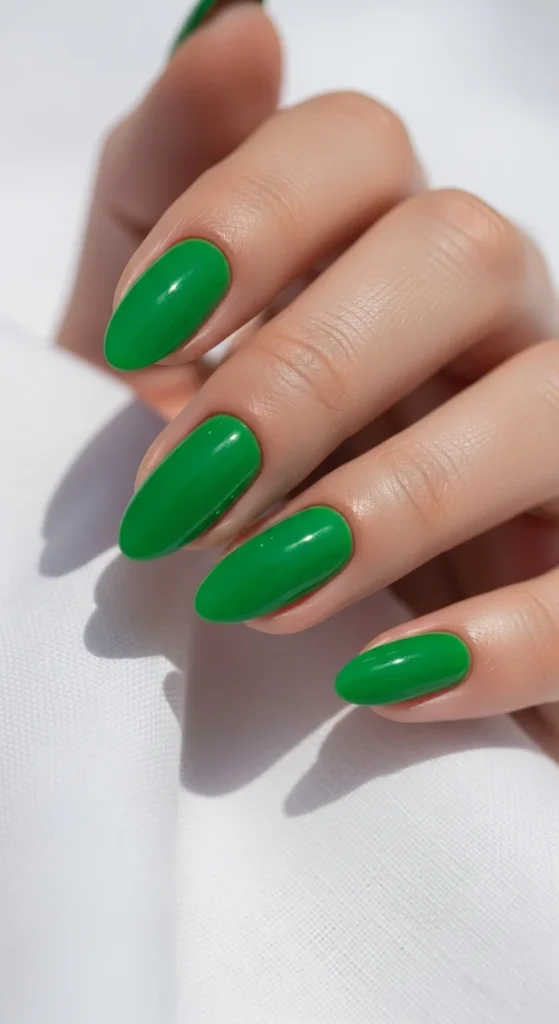
A sunny green is perfect when you want a cheerful color. Keep it simple and glossy so it looks clean.
If you want extra style without extra work, alternate solid green nails with a sheer nude nail that has a thin green tip.
Budget tip: mixing one accent nail into a solid set makes the manicure look planned without needing lots of tools.
Seal with top coat.
22. Mint and Nude Mix-and-Match Set
Mix-and-match sets are great when you can’t decide. Mint and nude looks clean and modern.
Try this layout: two nails mint, two nails nude, one nail nude with mint micro tip. Repeat across both hands.
Budget tip: planning a repeating pattern makes any simple set look more professional.
Finish with glossy top coat.
23. Green and White “Clean Contrast” Tips
Adding a thin white line above green tips makes the design look crisp and intentional.
Do nude base, then green tips. Use a thin brush to add a white line right above the tip edge. Keep it very fine.
Budget tip: if you don’t have a thin brush, use a nail art pen for the white line.
Seal with top coat.
24. Soft Sage Aura “Hazy Center”
This is the subtle version of aura nails. Sage keeps it muted and wearable.
Use a sheer nude base. Dab sage in the center with a sponge. Build slowly until you get a soft glow.
Budget tip: mix sage with a bit of white to make a lighter center shade if your sage is dark.
Finish with glossy top coat for a smooth look.
25. Green Chrome Outline French
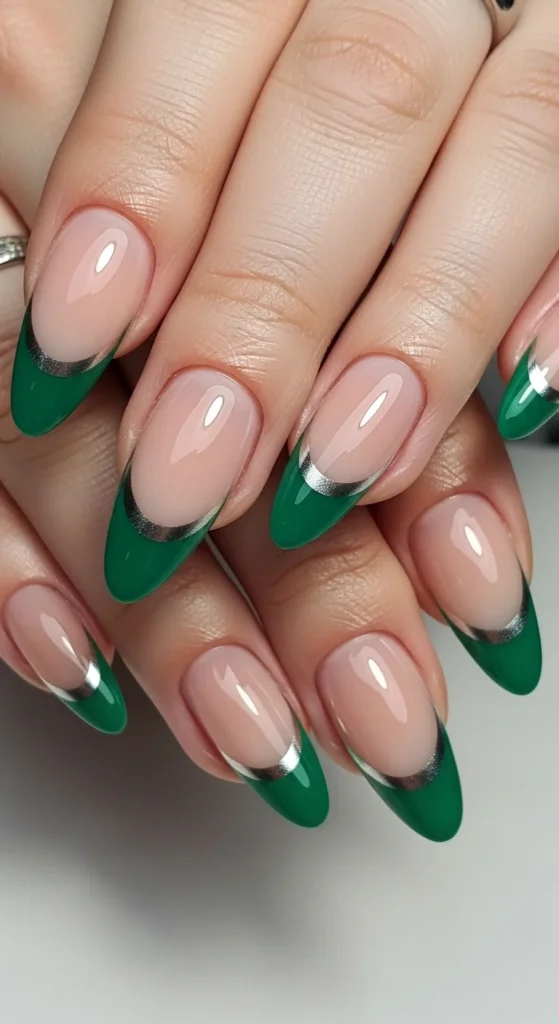
This combines French tips with a thin outline that makes the design pop.
Paint nude base. Add emerald tips. Outline the tip with silver metallic polish for a crisp edge.
Budget tip: do the outline on only two nails if you want less work.
Seal with top coat.
26. Olive “Tortoise-Style” Speckle Accent
Speckles make olive nails look textured and trendy.
Paint nails olive. On one nail, add small speckles using a toothpick dipped in black and brown polish. Keep it light so it looks like natural texture.
Budget tip: use an old toothbrush to flick tiny speckles, but cover the skin around the nail so it doesn’t get messy.
Seal with top coat.
27. Green “Garden Party” Floral Accent
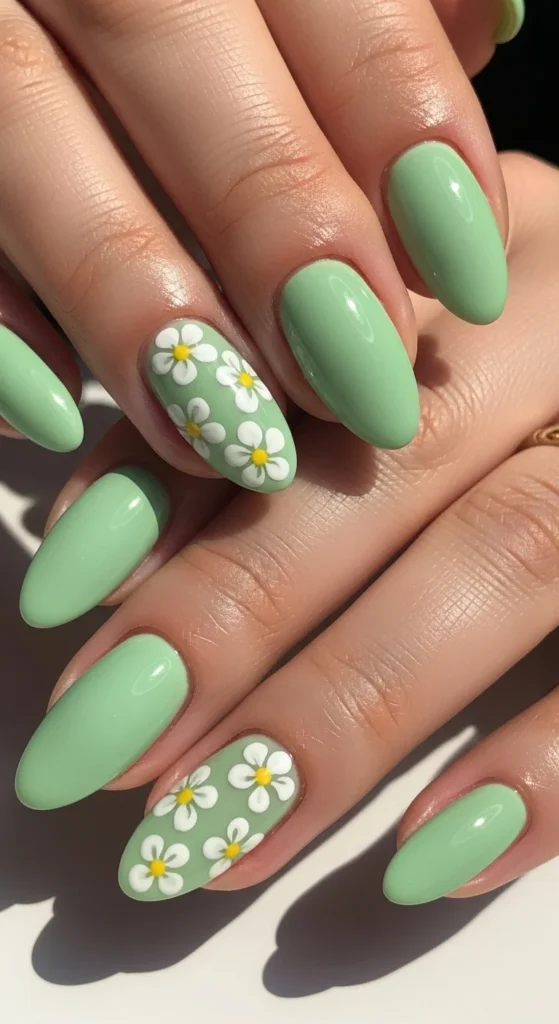
Tiny florals make green nails feel soft and pretty. Keep the flowers small and simple for a modern look.
Paint nails a soft green like pistachio or sage. On one nail, add tiny white flowers using a dotting tool. One dot for the center, five tiny dots for petals.
Budget tip: if dots are hard, use flower stickers. They look clean and save time.
Seal with glossy top coat.
Conclusion
Green nails can look minimal, earthy, bold, or glam—just by changing the shade and finish. Start with pistachio, sage, or olive if you want something easy to wear. Go for emerald chrome or velvet magnetic green when you want a richer look. Add simple accents like micro French tips, tiny dots, foil flecks, or one animal-print nail to keep it trendy without making it complicated. With thin coats, a good top coat routine, and a few budget tools like stickers and a sponge, these green nail designs are easy to recreate at home and fun to wear all year.

Leave a Reply