
Black nail designs are the go-to when you want something sleek, edgy, and wearable year-round. They can look minimalist and clean with thin lines and negative space, or dramatic with matte textures, chrome shine, and bold accents. The best part is you don’t need a salon to pull them off. With a good base coat, a steady hand, and a few affordable tools like striping tape or stickers, black nail art can look sharp at home.
Below are 24 edgy black nail designs that feel ultra chic, from subtle everyday ideas to statement looks for nights out.
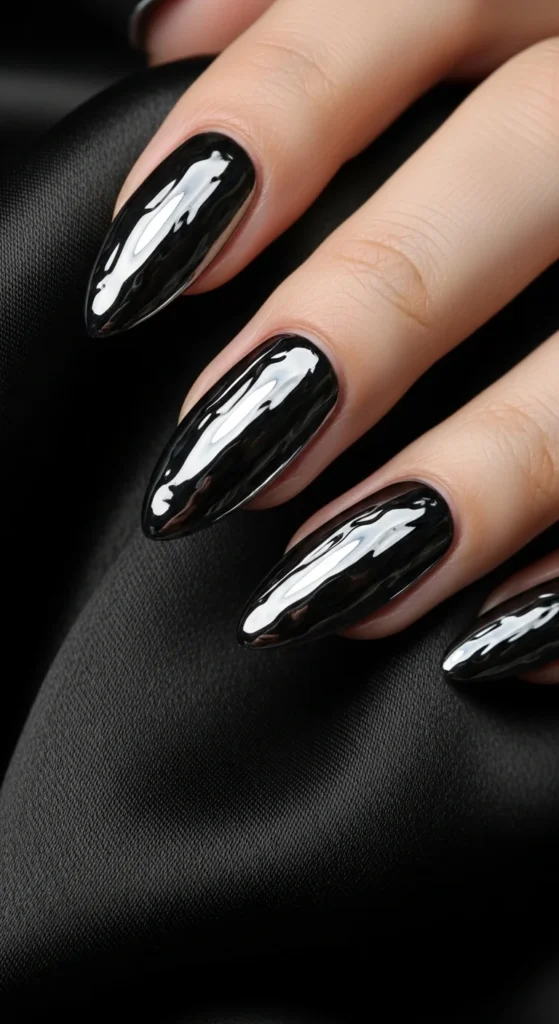
1. Glossy Jet-Black Classic
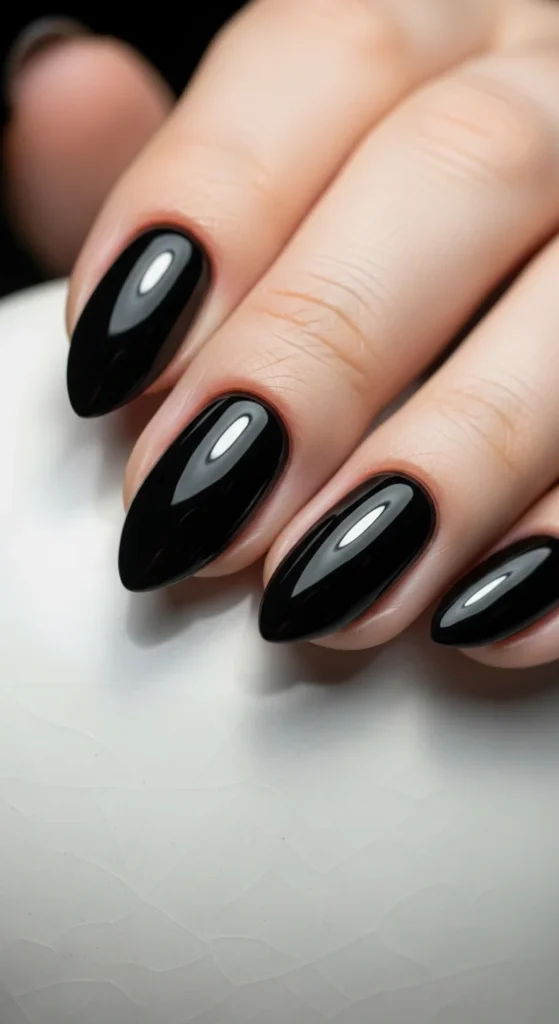
A glossy jet-black manicure is simple, bold, and always stylish. It works for short nails, long nails, and every outfit. The key is making the surface look smooth and glassy, because black shows every bump.
Start by lightly buffing your nails and using a ridge-filling base coat if you have one. Apply two thin coats of black polish instead of one thick coat. Thin layers dry faster and look more even.
If your black polish looks streaky, wait a full minute between coats. Then finish with a plumping top coat for shine that looks like gel.
Budget tip: if you don’t have a plumping top coat, apply your regular top coat twice—once after polish dries, then again the next day.
Keep cuticles moisturized. Black looks sharper when the skin around the nails looks neat.
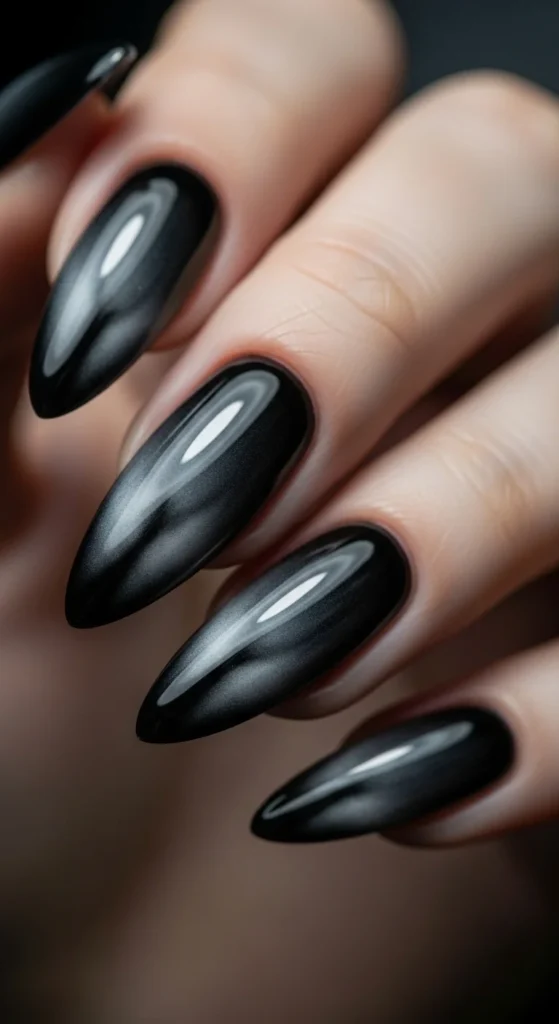
2. Matte Black Soft-Velvet Finish
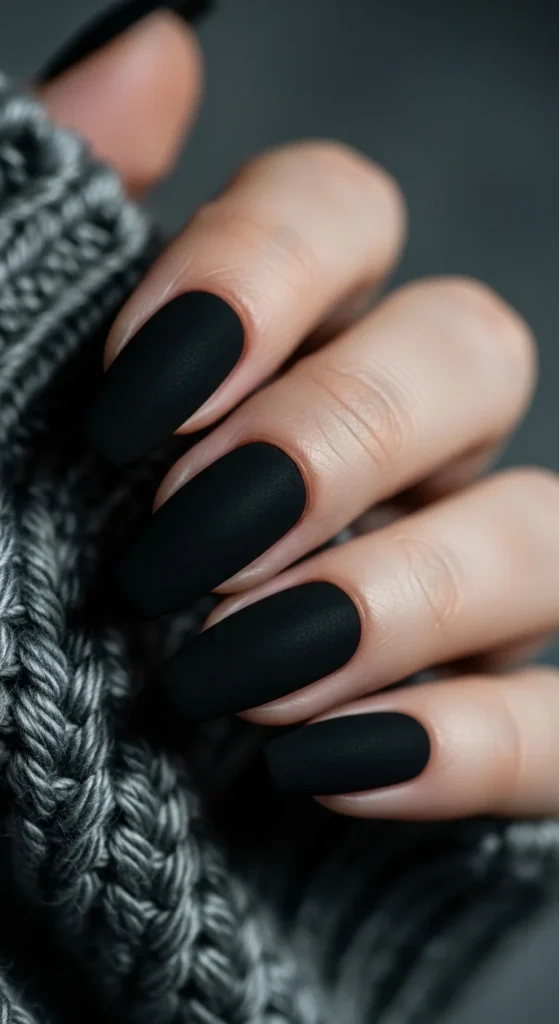
Matte black feels modern and a little mysterious. It gives that soft, non-shiny look that works especially well in fall and winter, but it’s still wearable all year.
Paint your nails black first. Let it dry fully. Then add a matte top coat. Matte top coats can show smudges if the polish underneath is still wet, so patience matters here.
If you want a richer look, keep nails medium length in almond or coffin shape. Matte looks extra clean on smooth edges and tidy shapes.
Budget tip: matte top coat is one of the cheapest upgrades you can buy because it transforms any color you already own.
To keep matte nails looking clean, avoid heavy lotions right after application. Once they set, you can moisturize as normal.
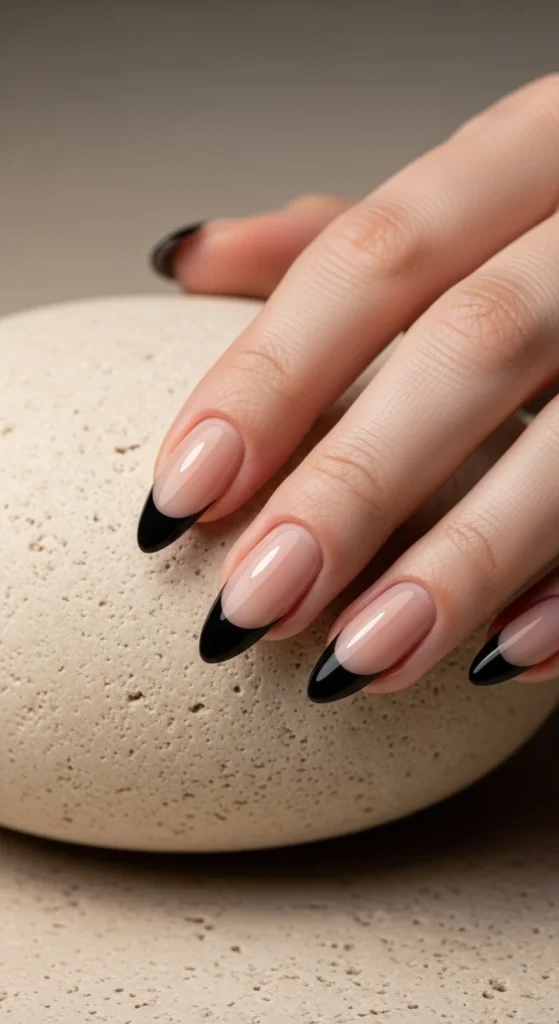
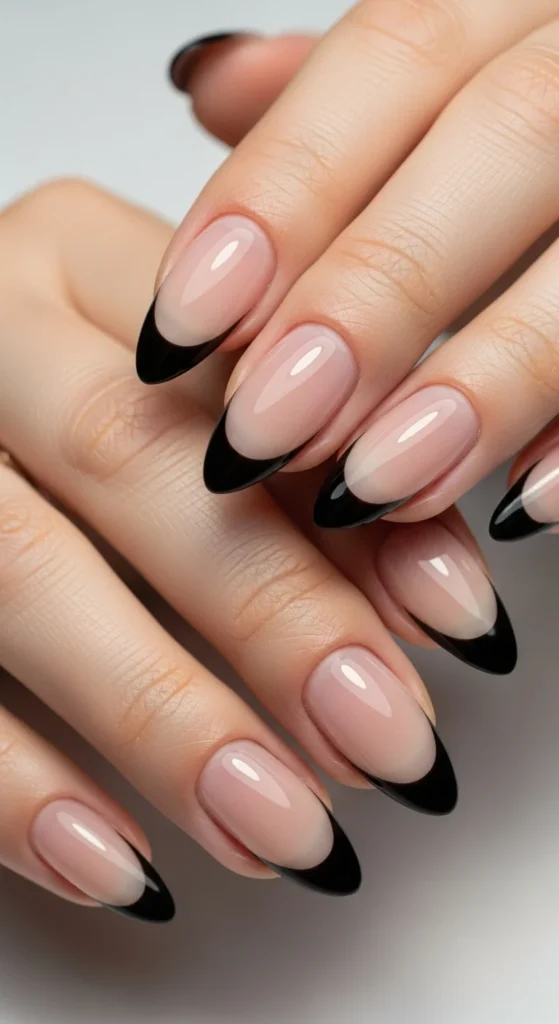
3. Black Micro French Tips on Nude

Black micro French tips are perfect if you want a soft edgy look that still feels minimal. The thin black line gives structure without covering the whole nail.
Use a sheer nude or pale pink base that matches your skin tone. Then add a very thin black line at the tip using a striping brush. Keep it delicate. Thick tips can look heavy.
If you are a beginner, use French tip guide stickers. They cost little and help you create a clean curve.
This design looks great on short square or squoval nails. It also grows out nicely, so you can wear it longer between touch-ups.
Finish with glossy top coat for a crisp, clean look.
4. Black French Tips with a Glossy Top Coat
A classic black French tip feels polished but a little edgy. It works for office outfits and night looks alike.
Start with a nude base. Let it dry completely. Then paint the black tip in a clean curved shape. Almond nails make the curve look natural, but square tips work too if you prefer a sharper style.
Budget tip: use a makeup sponge to lightly stamp black polish onto the tips. It can be easier than drawing a perfect line. Then clean up edges with a small brush dipped in remover.
Seal with top coat. If you want extra shine, apply another top coat the next day.
5. Negative Space Black Side Tips
Side tips give black nails a modern twist. Instead of a full French tip, the black polish sits on one corner, leaving most of the nail exposed. It looks sharp and intentional.
Apply a clear or nude base first. Use striping tape to block off a triangle at the edge of the nail. Paint black over the corner, then peel the tape while polish is slightly wet.
This style is great for DIY because small imperfections are less noticeable when the shape is angled.
Budget tip: if you don’t have striping tape, use small pieces of scotch tape and press the edges down firmly.
Finish with glossy top coat so the edges look smooth.
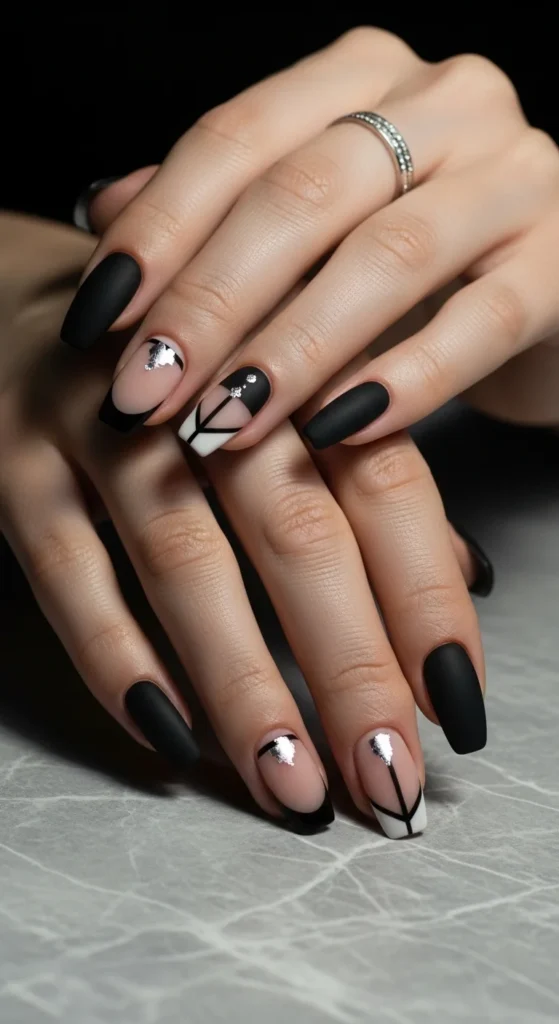
6. Geometric Negative Space Blocks
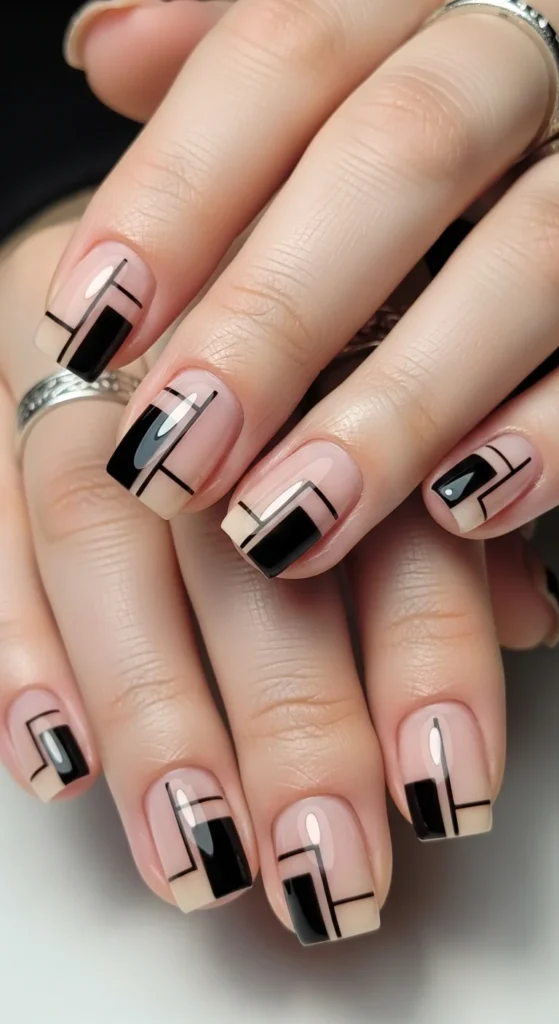
Geometric designs look super chic when they are clean and simple. Think small black rectangles, diagonal blocks, or half-and-half sections that leave skin-toned space visible.
Start with a nude base. Use striping tape to create straight shapes. Paint black over the exposed area, then remove tape carefully.
Keep the design on two or three nails. Leaving some nails plain nude makes the whole look feel more intentional.
Budget tip: nail tape is cheap and lasts a long time. It’s one of the easiest ways to get clean lines at home.
Seal with glossy top coat so the design sits flat and smooth.
7. Minimal Black Abstract Lines on Clear Base
If you like subtle nail art, thin black lines on a clear base are perfect. It feels modern, clean, and easy to wear.
Use a clear or sheer nude base. Then draw thin curves or squiggles with a fine brush or nail art pen. Keep the lines light and slightly imperfect. That’s what makes it look artistic.
This is a great beginner design because it doesn’t require perfect symmetry.
Budget tip: use a toothpick for thin lines if you don’t have nail brushes. Dip lightly and work slowly.
Finish with glossy top coat to lock the lines in and keep everything smooth.
8. Black Marble Veins
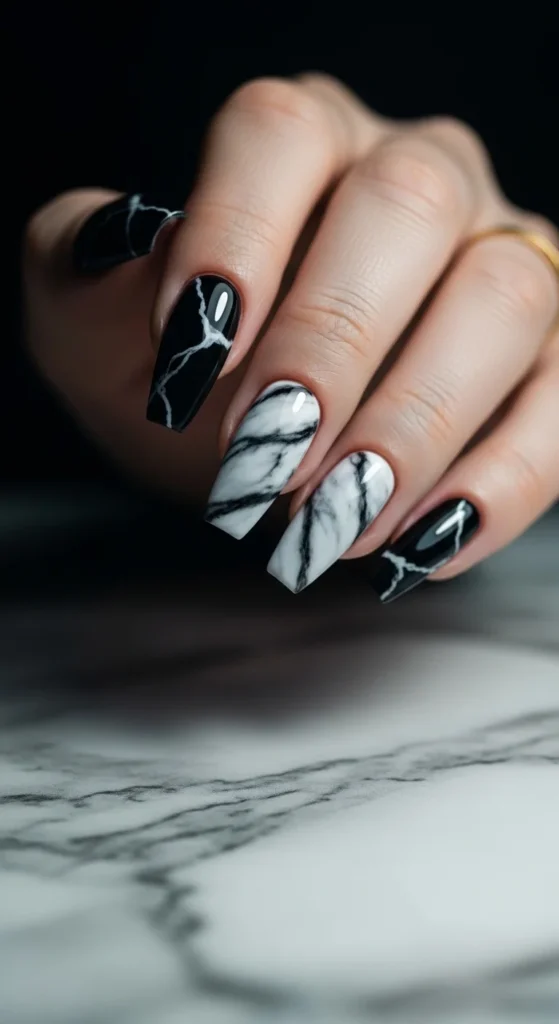
Black marble nails look expensive but can be done at home with a simple technique.
Paint nails black first. While the polish is still slightly tacky, add small wisps of white and grey using a thin brush or a piece of plastic wrap. Lightly dab so the lines look natural.
Keep marble on one or two nails as accents if you want a cleaner look.
Budget tip: use a white nail art pen to draw quick veins, then soften them by tapping lightly with a sponge.
Seal with glossy top coat for that polished stone effect.
9. Chrome Black Mirror Nails
Chrome black looks like liquid metal. It is dramatic, sleek, and perfect for nights out.
Use a black gel base for the best result. After curing your top coat, rub chrome powder onto the surface. Use gentle pressure and build slowly.
Budget tip: if you don’t have chrome powder, use a metallic black polish or a shimmer top coat. It won’t be full mirror, but it still gives a shiny effect.
Almond and coffin shapes show reflections best.
Seal with top coat and avoid thick layers so the mirror look stays crisp.
10. Black Ombre Fade to Nude
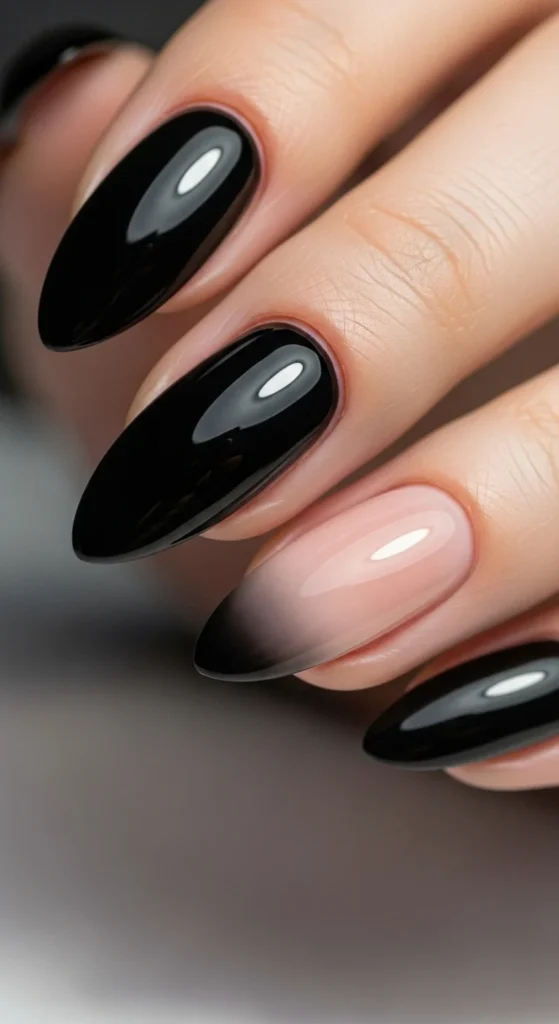
Black ombre looks dramatic but still wearable because the nude base softens it. It also grows out nicely, so it lasts longer.
Apply nude base first. Use a sponge to dab black polish from the tip downward. Build the fade slowly with thin layers.
Keep the gradient soft. Harsh lines can look patchy.
Budget tip: use a small makeup sponge and dab gently. Replace sponge when it starts to clump.
Finish with glossy top coat to smooth the sponge texture and make the fade look seamless.
11. Celestial Stars and Moons
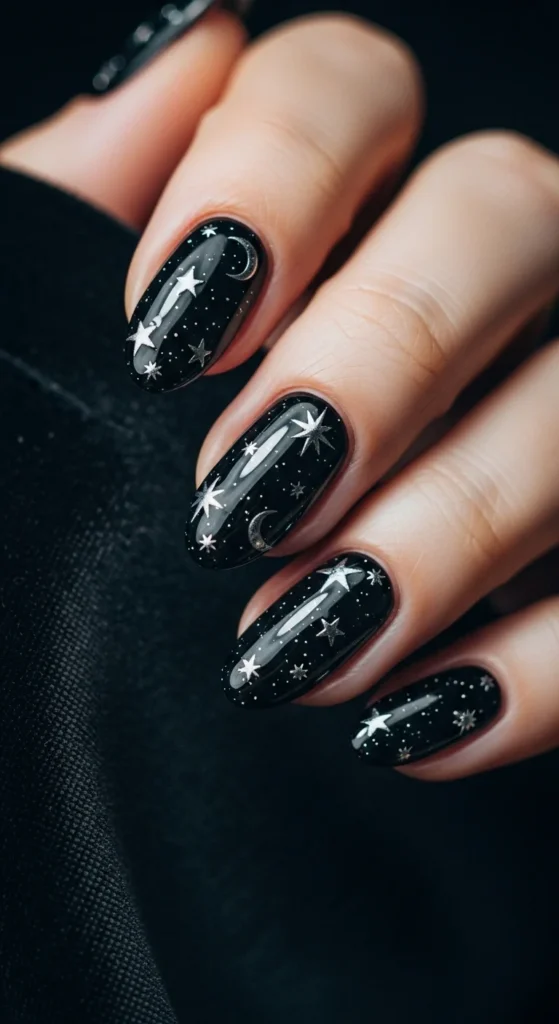
Celestial accents give black nails a dreamy vibe without feeling childish. Tiny stars and moons look best when they are minimal.
Paint nails black, then add small silver decals or hand-drawn stars with a dotting tool. Keep it to one or two nails for a clean look.
Budget tip: nail sticker packs are cheap and make this design easy.
If you want extra shine, add a small glitter topper only on the accent nails.
Seal with glossy top coat so the decals sit flat.
12. Gothic Rose Accent on Matte Black
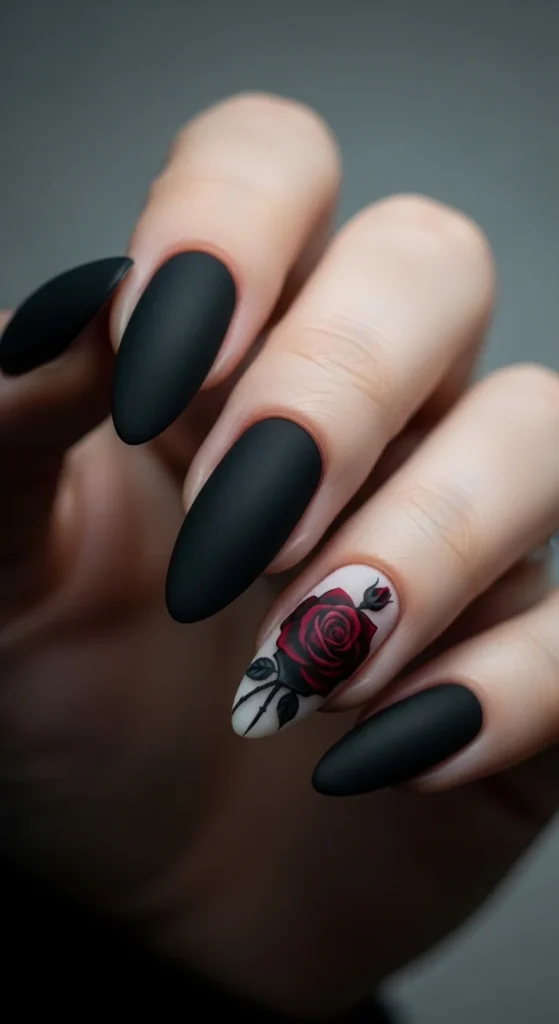
A rose accent on matte black feels romantic and edgy at the same time. It works best when the design stays minimal.
Use matte black on most nails. Add a rose design on one nail using a decal, sticker, or stamping plate.
Budget tip: rose nail stickers are easier than painting and still look clean.
Keep the rose in black, deep red, or grey tones for a darker vibe.
Seal with a thin top coat only on the accent nail if you want to keep the matte look on the others.
13. Silver Foil Flashes on Black
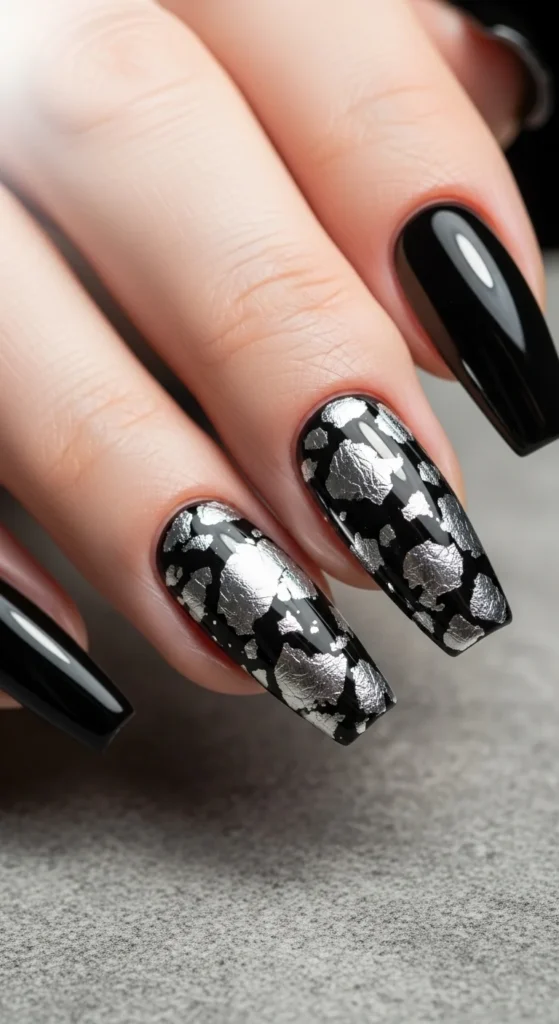
Silver foil makes black nails look modern and sharp. It’s a quick way to add shine without doing detailed art.
Paint nails black. While polish is slightly tacky, press tiny foil pieces onto one or two nails. Keep it light. Too much foil can look messy.
Budget tip: craft foil sheets work fine. Cut them into small pieces.
Seal with two top coats so foil edges feel smooth and don’t lift.
14. Pearl Dot Accents for Contrast
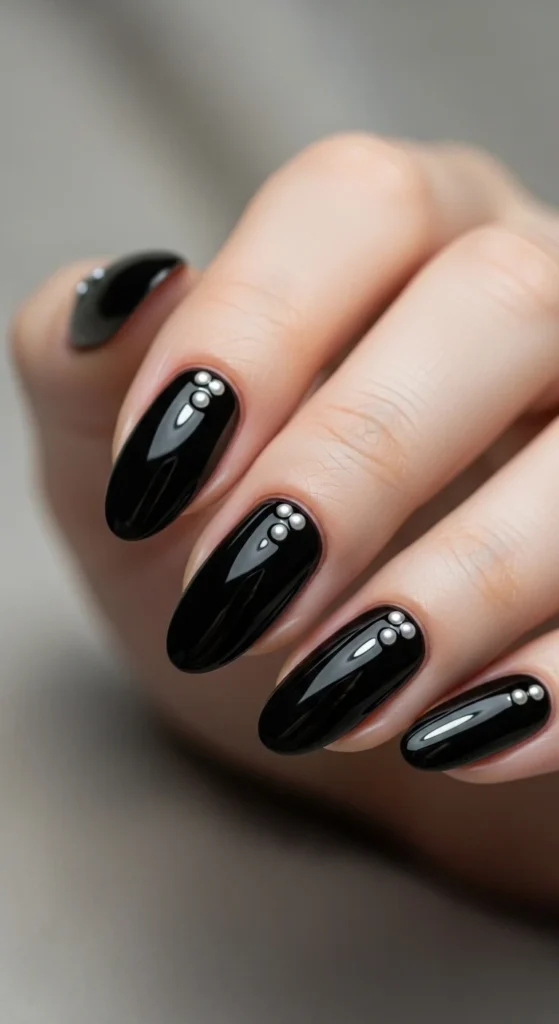
Pearl dots on black look elegant and clean. The contrast is soft but noticeable.
Paint nails black. Use a dotting tool to place small white dots near the cuticle on one or two nails.
You can also use tiny half-pearls if you want dimension. Choose small ones so they don’t snag.
Budget tip: a toothpick works as a dotting tool. Just keep dots tiny.
Seal with glossy top coat to keep the dots smooth and secure.
15. Black Glitter Accent Nail
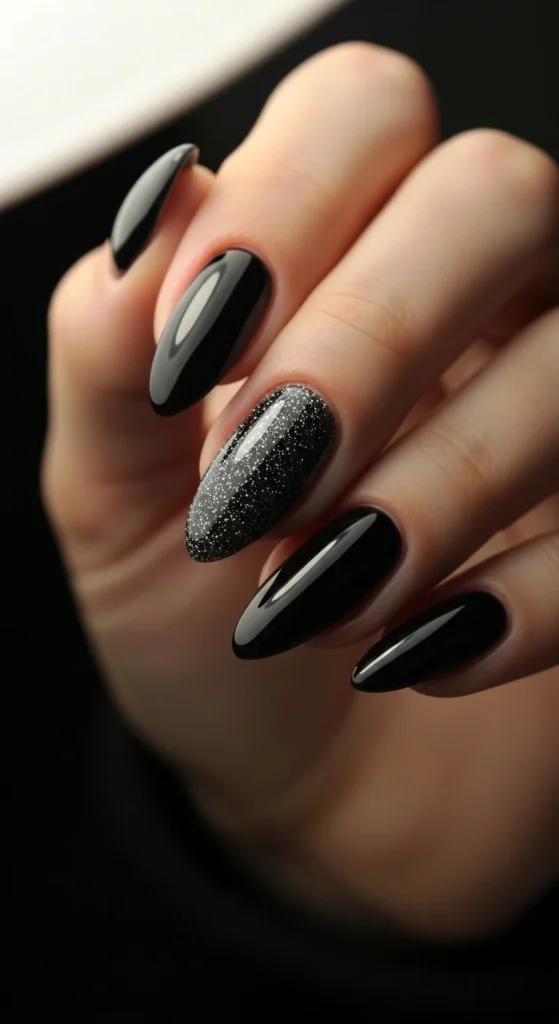
If solid black feels too plain, add one glitter accent nail. It keeps the look simple but gives it a night-out vibe.
Paint most nails black. On one nail, apply black glitter polish or a glitter topper over black base.
Fine glitter looks smoother and more polished than chunky glitter.
Budget tip: use eyeshadow glitter carefully as a topper by pressing it into tacky top coat. Then seal well.
Finish with glossy top coat so the glitter feels smooth.
16. Black Leopard Accent with Gold Spots
Leopard print makes black nails feel bold and stylish. Gold spots add a modern touch.
Paint most nails black. For the accent nail, use a nude base. Add irregular black spots, then dab tiny gold touches around them.
Budget tip: use nail stickers if hand painting feels hard.
Keep leopard to one nail so the look stays clean.
Seal with top coat for a smooth finish.
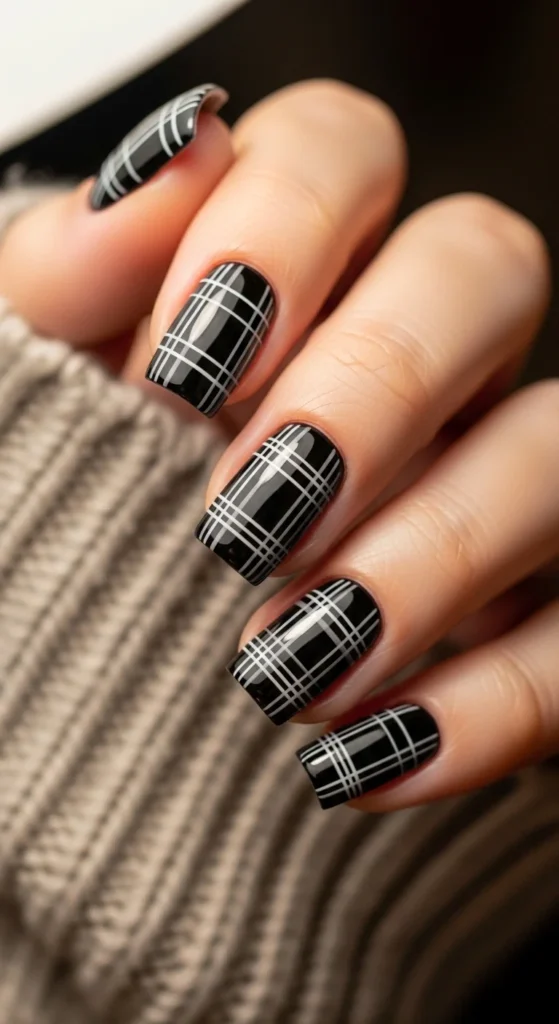
17. Black Plaid Winter Checks
Plaid on black feels cozy and edgy at the same time. It’s a great winter look.
Paint nails black. Use striping tape or a fine brush to add thin white and grey lines in a plaid pattern.
Keep plaid to one or two nails if you want it easier.
Budget tip: nail striping tape is cheap and helps you get straight lines fast.
Seal with glossy top coat to smooth any raised lines.
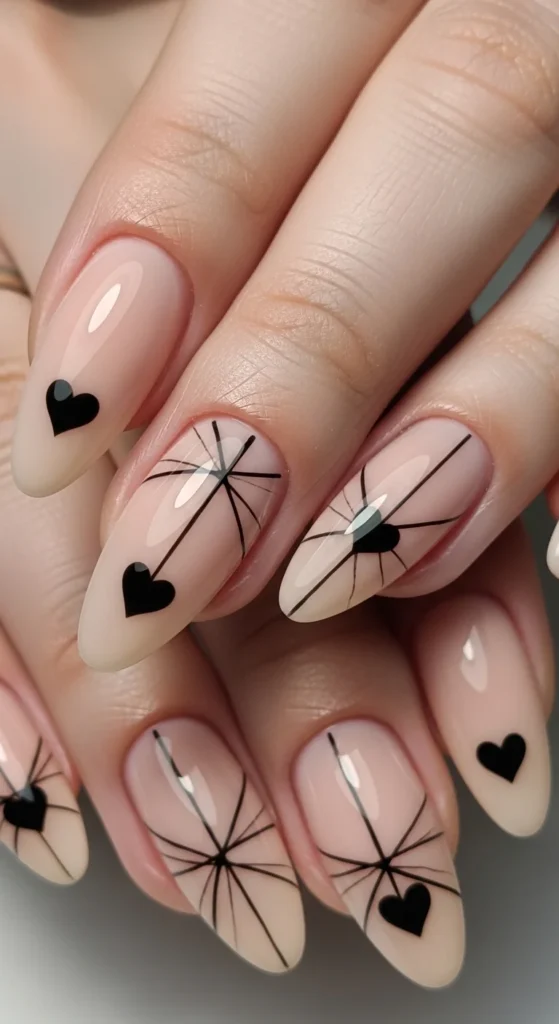
18. Black Heart Motif Accent
Black hearts can look edgy and cute when the design stays minimal.
Use a nude base and paint small black hearts on one or two nails. Add a thin outline heart for a more modern look.
Budget tip: heart stickers are quick and clean.
Keep the rest of the nails plain black or nude so the design stands out.
Seal with top coat to keep edges smooth.
19. Studded Matte Black Nails
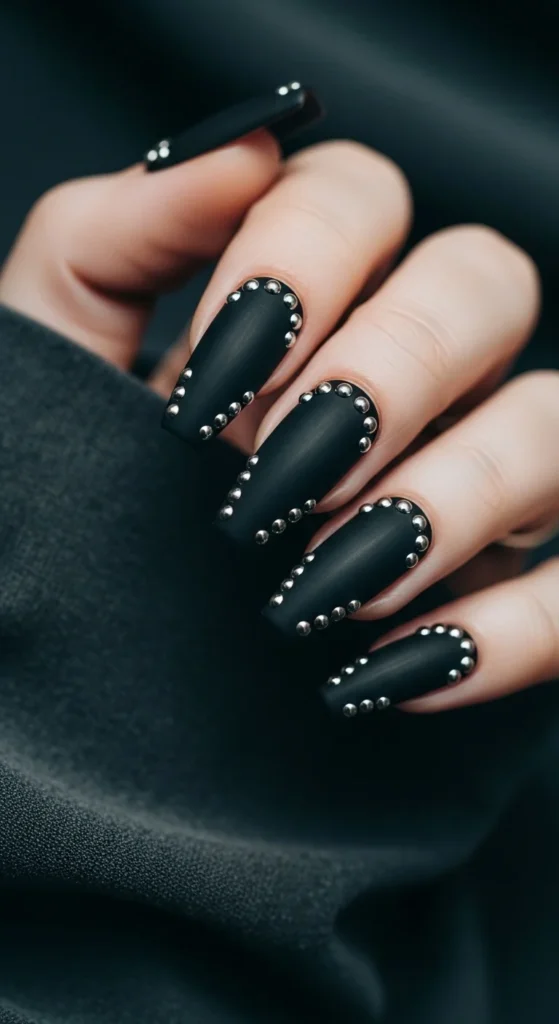
Studs add texture and shine to matte black nails. It’s a simple way to make the manicure look more detailed.
Apply matte black first. Then add tiny studs to one or two nails using nail glue.
Choose small flat studs so they don’t snag.
Budget tip: buy mixed stud wheels online. They last a long time and cost little.
Seal around studs with top coat to help them stay put, while keeping the rest matte.
20. Coffin Black with Chrome Tips
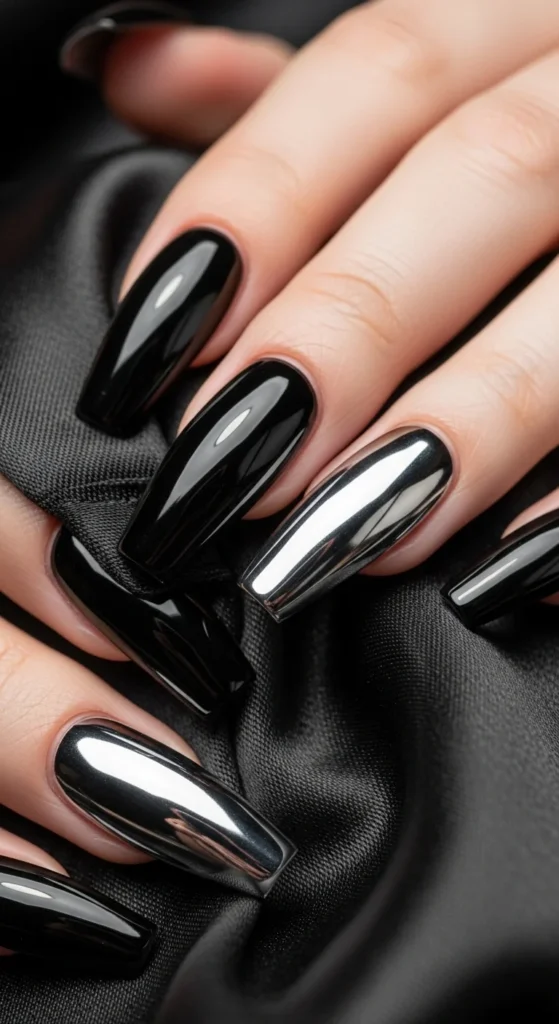
Chrome tips on black coffin nails look bold and modern. The contrast makes the shape stand out.
Paint nails black. Add chrome powder only to the tips, keeping the rest glossy black.
If you don’t have chrome powder, use metallic silver polish for the tips.
Budget tip: press-on sets often come with chrome-tip styles for less cost than salon nails.
Seal with top coat and keep tips smooth so the metallic finish looks clean.
21. Short Square Moody Black

Short square black nails feel clean and modern. They are practical and easy to maintain.
Use glossy black polish and keep the corners slightly softened so they don’t snag.
This style is great for daily wear and looks neat with minimal effort.
Budget tip: apply top coat every two to three days to reduce chips, because black chips can show fast.
Moisturize hands and keep cuticles tidy for the sharpest result.
22. Black Aura Haze Nails
Aura nails in black look smoky and mysterious. The hazy fade keeps it softer than solid black.
Use a sheer nude base. Dab black into the center using a sponge, then soften edges by tapping lightly.
Keep it subtle. Heavy black can make the design look harsh.
Budget tip: use a small eyeshadow sponge for more control.
Seal with glossy top coat to smooth the sponge texture.
23. Floral Negative Space Blooms
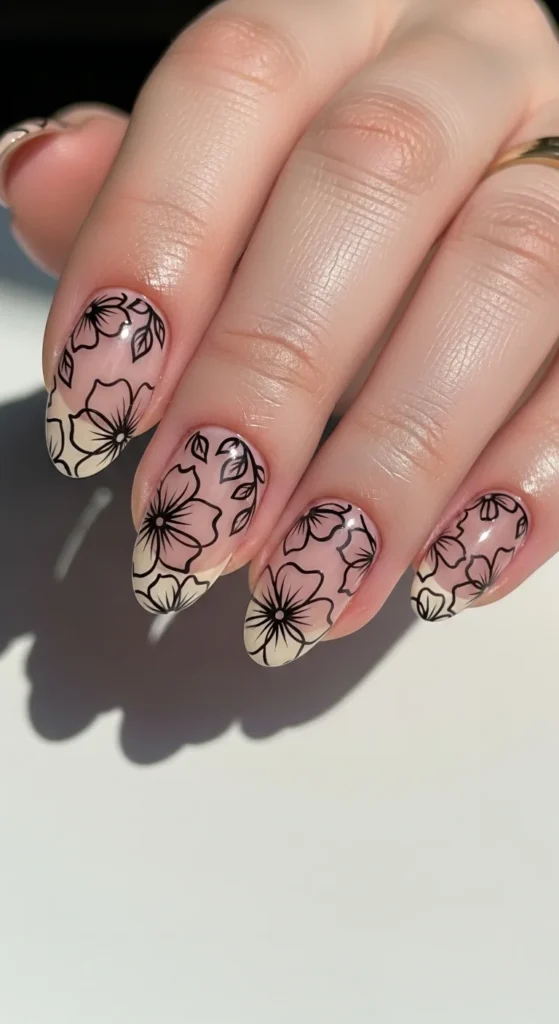
Floral negative space gives you a goth-romance look without full heavy black nails.
Start with a nude base. Draw small black flower outlines on one or two nails using a thin brush or nail pen. Leave most of the nail bare.
This style looks clean and modern because the design stays light.
Budget tip: floral stamping plates are affordable if you want clean outlines without freehand work.
Seal with glossy top coat for a smooth finish.
24. Industrial “Metal Drip” Accents
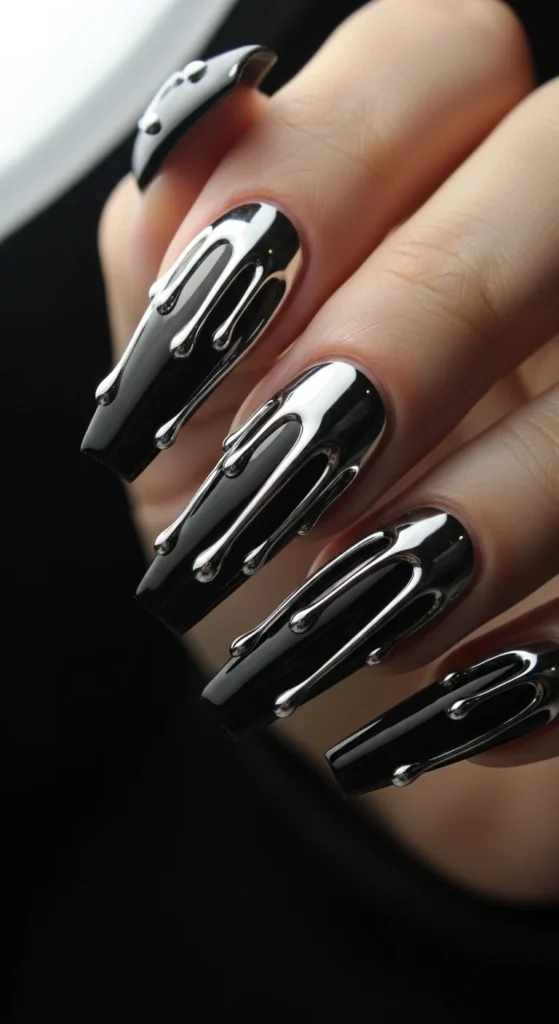
Metal drip accents give black nails a bold, modern look that feels edgy and stylish.
Paint nails black. Use metallic silver polish to create small drip shapes from the tip or side. Keep drips thin and irregular so they look natural.
If you want it easier, use nail stickers shaped like drips or abstract chrome decals.
Budget tip: metallic nail tape can also create a similar vibe if you layer small torn pieces near the tip.
Seal with glossy top coat to smooth the design and keep it shiny.
Conclusion
Black nail designs can look sleek, edgy, and ultra chic without being hard to recreate. Try glossy black when you want a clean classic, matte finishes for a softer mood, and negative space or metallic accents when you want something more modern. Start with one accent nail if you’re new to nail art, then build up to lines, marble, or chrome tips. With a few affordable tools and a steady top coat routine, black nails can look sharp at home any time of year.

Leave a Reply